In the previous part we discussed the creation of a backend for messaging app. This time I would like to describe how to connect the frontend with our backend. Step by step, I will cover every endpoint by adjusting adequate action for them and finally, present how it works.
This is the second part of Simple chat app with React Native:
- Creation of backend for messaging app
- Fullstack — connecting backend with frontend
What tools do we need?
Once more we need to answer this question. Surely, a tool for the state management is our must have. Why? Conversations and messages are changing constantly, therefore a tool which will help us control the application state is necessary. My first choice was Redux, which manages state through a single JavaScript object, known as a data store, where all of our application’s state is located. We simply have to install redux with the React bindings:
Did you hear about Gifted Chat? It’s pretty cool complete chat UI for React Native, which will make displaying messages so much easier. Let’s add it to dependencies:
Connecting to the Socket.IO server
Socket.IO provides bi-directional communication in realtime and works perfectly for chat based applications. What is the biggest advantage of using it? We don’t have to involve polling the server for changes, because server immediately will get a message and push it to connected client.
The Socket.IO server we created recently is listening to the ‘connection’event, which is automatically sent by the client. Our task is to send the user id as an init message, so that the server can identify the user the socket is connected to.
Let’s also add a listener for the ‘message’ event on the server which receives messages from the client and creates a message object to store in the database.
Need to conduct React Native training in your company? Talk to us!
Actions, reducers and store … so Redux
Firstly, we need to define createConversation action. According to official documentation actions are:
Payloads of information that send data from your application to your store. They are the only source of information for the store. You send them to the store using <rte-code>store.dispatch()<rte-code>.
Let’s dive into code represents creating conversation:
The action is calling for a specific endpoint, in this case, it’s <rte-code>/conversation<rte-code>. The data that is sent is friendId, so in the conversation are kept two ids: conversation and friend.

Because of <rte-code>redux-thunk<rte-code> middleware, we are able to dispatch action when we get the response. In a case when a response doesn’t include an error, createConversationSuccess() action is dispatched sequentially with navigating to conversation chat view.
Reducer’s job is to specify how the application’s state changes in response.
When conversation creation is successful, the returned value is an array of conversations, which are spread and overwritten by action payload, so action.conversation. Simultaneously currentConversationId is set on action.conversation.Id.
Creating a message is much simpler. It’s a typical action from the action creator. What does it mean? Just that action creator is a function which returns an action.
In our example function is called sendMessage and returns action type ‘SEND_MESSAGE’. The function accepts two arguments, where the first- conversationId is needed to identify a destination for second — message.
We are following optimistic update approach likewise WhatsApp does, which means that a message is immediately appended to conversation before server responds. If it fails, we should display an error and give the user an opportunity to retry his request.
Similarly as before, state is changing in reducer and the result is message added to the exact conversation.
At this stage, we are ready to load created conversations and sent the messages. The actions for them are very similar. The differences are:
- an endpoint for which action is dispatched
- passed argument (conversationId) that is needed only in receiving messages action.
How should the state change in reducer? Obviously, it will return state with all messages for given id.
Store is a perfect place for holding the whole state tree of chat application. It’s worth to split reducing function into separate functions as well and then use combineReducers which is passed to createStore.
It would look like:
Time for a little chat
Our logic is ready, so let’s create the containers for displaying conversations. Most likely we need to prepare two views:
- user account panel with friend list with whom we are messaging and option to add mate to chat,
- chat window for texting a message.
It’s time to tackle the main view called UserAccount, where you have to connect states from reducers and redux action. Here’s how it will look like:
To receive the user’s friends and all conversations will dispatch two actions inside the lifecycle method componentDidMount(). This approach ensures us that data won’t be loaded until after the initial render and is fetched only from the client.
So what happens to the other two actions? Let me explain it, but first look at the code below:
FriendList is a styled FlatList which renders a sorted array of friends, where a single friend is an object with _id and fullName. Tapping on friend item calls the onSetCurrentConversationId() function and navigates to chat view when the conversation has been started or otherwise will create new conversation by firing onCreateConversation().
ConversationChat is a view for texting a message, so the most appropriate place to connect sending and loading messages. I think, you are already familiar with it, but just in case check the code snippet:
Once again within componentDidMount() we are dispatching action- this time onLoadMessages().
I hope that you are still following, because it’s the time for implementing onSendMessage() action! Let’s start it by creating a function wrapper inside, where we will be sending the ‘message’ event to the server. At the same time, we can update redux state. Then close the function with firing the action.
The last step is to use GiftedChat where we pass the following props:
- messages as an array of messages to display,
- onSend as a callback when user is sending a message,
- user, which is just user’s id.
How does it work?
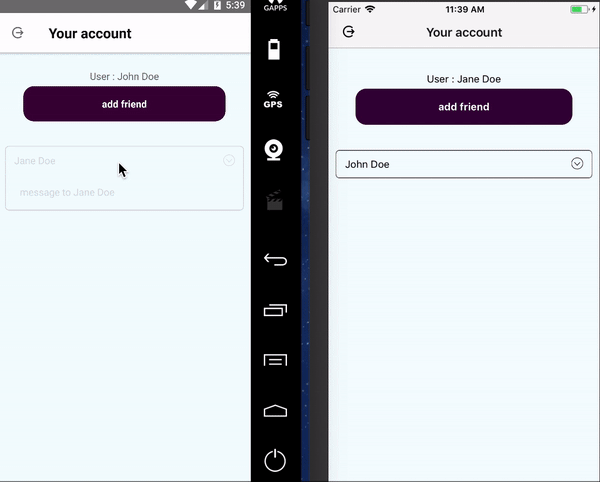
I hope you enjoyed this article, and creating simple chat app is easier for you now. Everything you read today can find inside an friendChat app.


Learn more about Backend
Here's everything we published recently on this topic.