In today's digital world, image assets are a big deal for applications. They make the user experience better, convey information effectively, and make apps visually appealing. As we focus more on keeping users engaged, the quality and relevance of image assets are crucial for an app's success.
One important thing to note about image assets is the use of Scalable Vector Graphics (SVGs). SVGs are popular because they can be scaled easily, have small file sizes, and work well with different screen resolutions. Unlike raster images, SVGs are resolution-independent, meaning they can be scaled to any size without losing quality. This makes them ideal for responsive web design and ensures a consistent user experience across different devices and screen sizes.
Now that we understand the importance of image assets, especially SVGs, let's consider using them throughout our app. However, we need to be mindful of the SVGs' size. If they're not optimized for a smaller size, it can increase the overall size of our app (e.g., APK). Larger SVGs also take longer to appear on the screen.
In this article, we will see how SVG’s size affects the rendering period, how we can reduce the SVG’s size without compromising on quality and how we can automate this step on CI. Let’s get started!
Setting up a project
We will create a react-native project from scratch for our playground. You can create it by running the following command:
npx react-native init SVGDemo
Once that’s done, run the app on Android to see everything is working. We are going to use the following SVG file, downloaded from pixelied. The size of this SVG is around 197 KB.

Playing with the app
Now we will render the above SVG in our app. For that, you can add the following code in App.tsx.
Pro Tip: When measuring rendering time for a component that mounts immediately, like in our case. It’s better to show a button, which toggles the state and then the component is mounted. This is beneficial when using React DevTools as it allows DevTools to properly launch and we do not lose any valuable profile trace.
Now you can run your app and you’ll see the output similar to the following:

We now have to measure the impact of this SVG on the render time. We will achieve this with the help of React DevTools. Run the following command to launch the React DevTools:
npx react-devtools
Expanding the trace we got from React DevTools, we see that our SVG takes around 36 milliseconds to render.
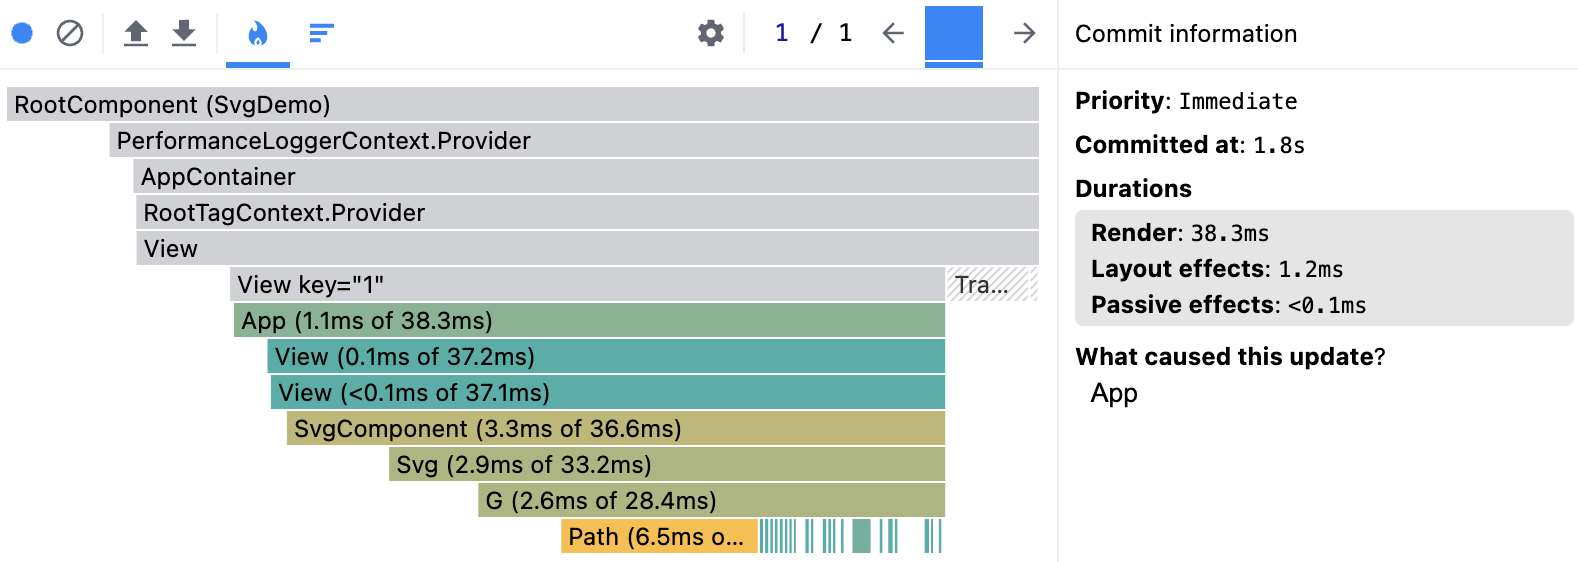
For a single SVG this rendering time might be trivial. But imagine in a real application, where you will have many SVGs and if they are taking ~36 milliseconds to render, then it’s an alarming situation. So how do we optimize this? We know that our SVG is around ~197 KB in size and it would be great if we can reduce this size, so our SVG renders faster.
The best tool to achieve this is SVGO. It offers a web editor SVGOMG, where you can manually upload your SVG and optimize it using the editor. It also offers a cli-tool svgo, which allows us to optimize many SVGs at once.
Let’s start with svgo cli tool by installing it globally:
npm install -g svgo
Once done, we will execute the following command which will compress our SVG based on the default svgo config file.
svgo -f ./src/assets/images -o ./src/output
The above command takes the SVGs presented in images directory and generate the optimized SVGs in output directory. Since we have only 1 SVG present in images directory, only that file will be optimized and produced in output directory.
The command above also prints some metadata which tells us how much optimisation is gained. See in the below image that our file was reduced by 43.3% and the size now is 109.3 KB.

Let’s use this optimized SVG in our react-native app and see how much time it’s spending while rendering. Using the React DevTools, following is the profiling trace we have:
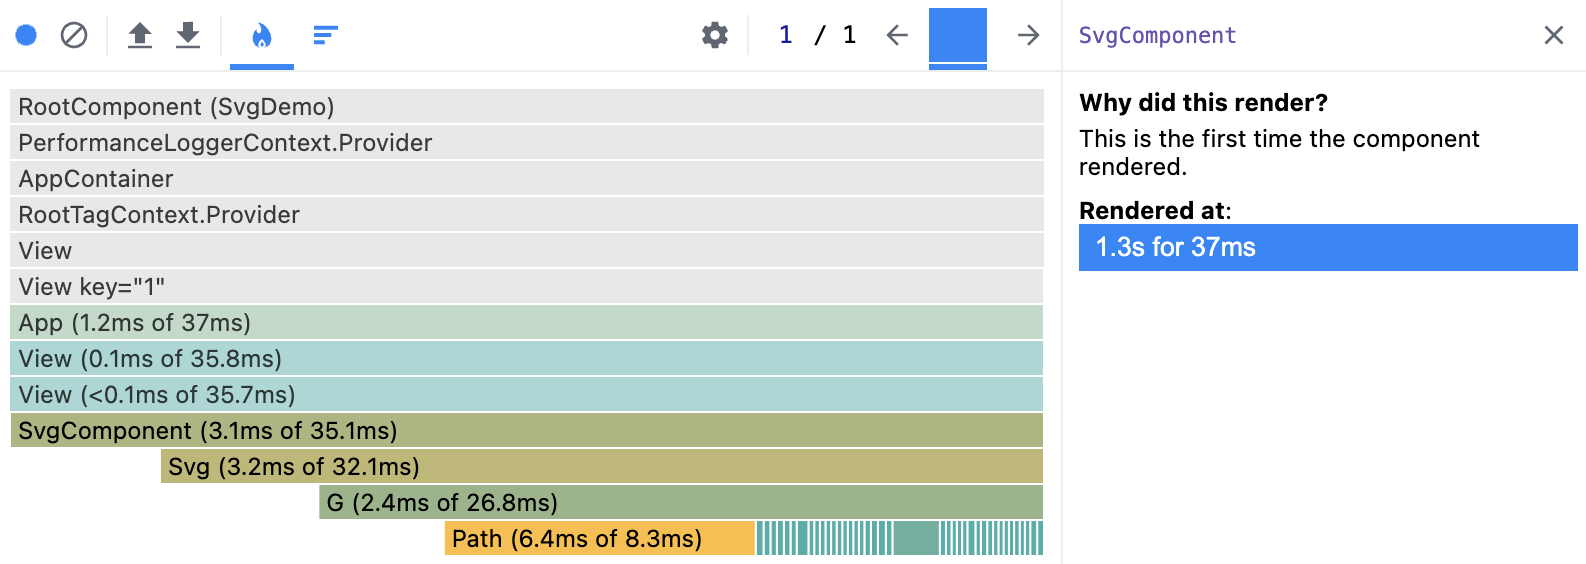
We don’t see that much of a difference in the rendering time even though the SVG size is reduced. Also, our SVG size is still 109 KB and we can try to further optimise it. There’s a list of plugins which we can supply to svgo cli using a config file. However, in most cases we won’t need to define additional plugins in a config file because the default config file is enough. But in our case, we need to add some additional plugins.
But what plugins should we add to our config file? To find it out, we need help of SVGOMG web editor where we will upload our original SVG and apply some options. Then we will apply those options in our local config file. Below is what the output of the web editor would look like once you upload the SVG on it and toggle the Gzip switch from the right pane.
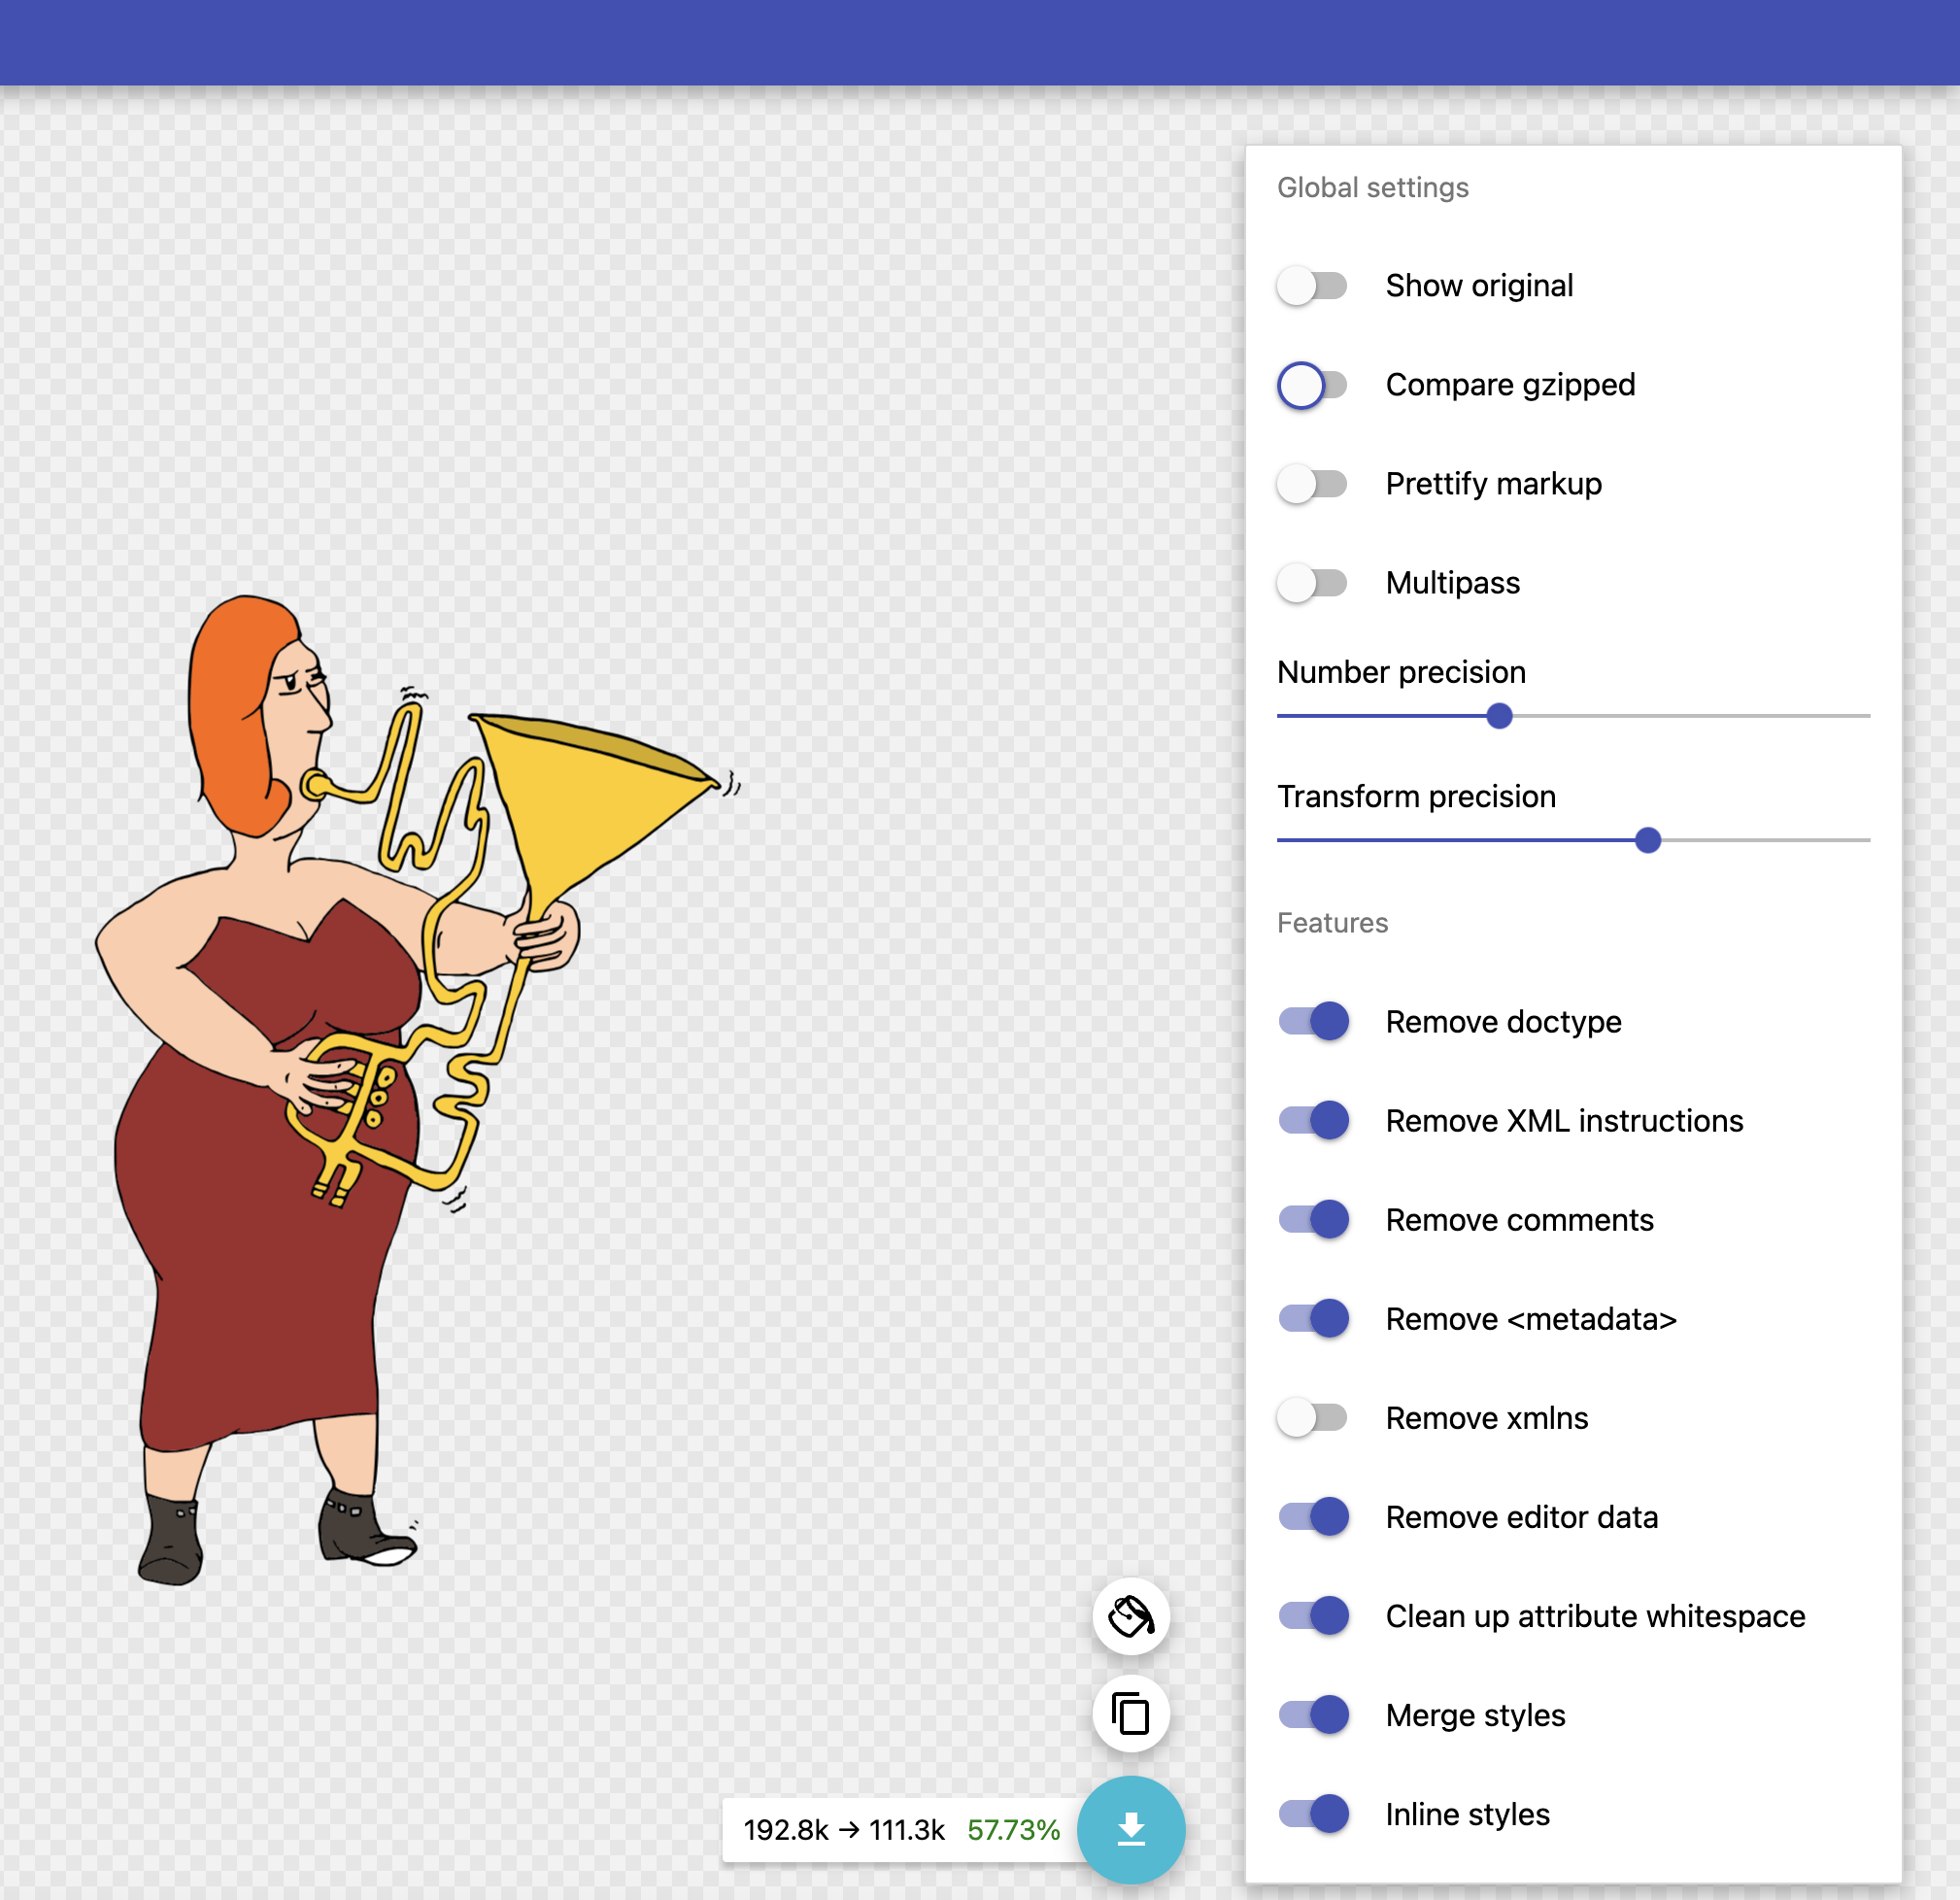
At the bottom, we can see the optimized SVG size. Also, some optimizations are automatically applied by the web editor itself. We can double-check the optimizations that are toggled and they also exist in the default config.
If they do exist and they are not having any impact from cli but it’s having impact on web-editor, we will need to manually add that plugin to the config file. In our case, Remove useless stroke & fill which is removeUselessStrokeAndFill and Round/re-write paths which is convertPathData, so how do we add these to our config file?
We will extend the default presets and add these two plugins to the config file. Below you can see what our config file will look like:
You can play with the Features/ Plugins and any UI elements or features you find beneficial. All you need to do is add them to your config file. For example, if you scroll the right pane, there’s a plugin called Style To Attributes. If you enable it, we will have following as the output:
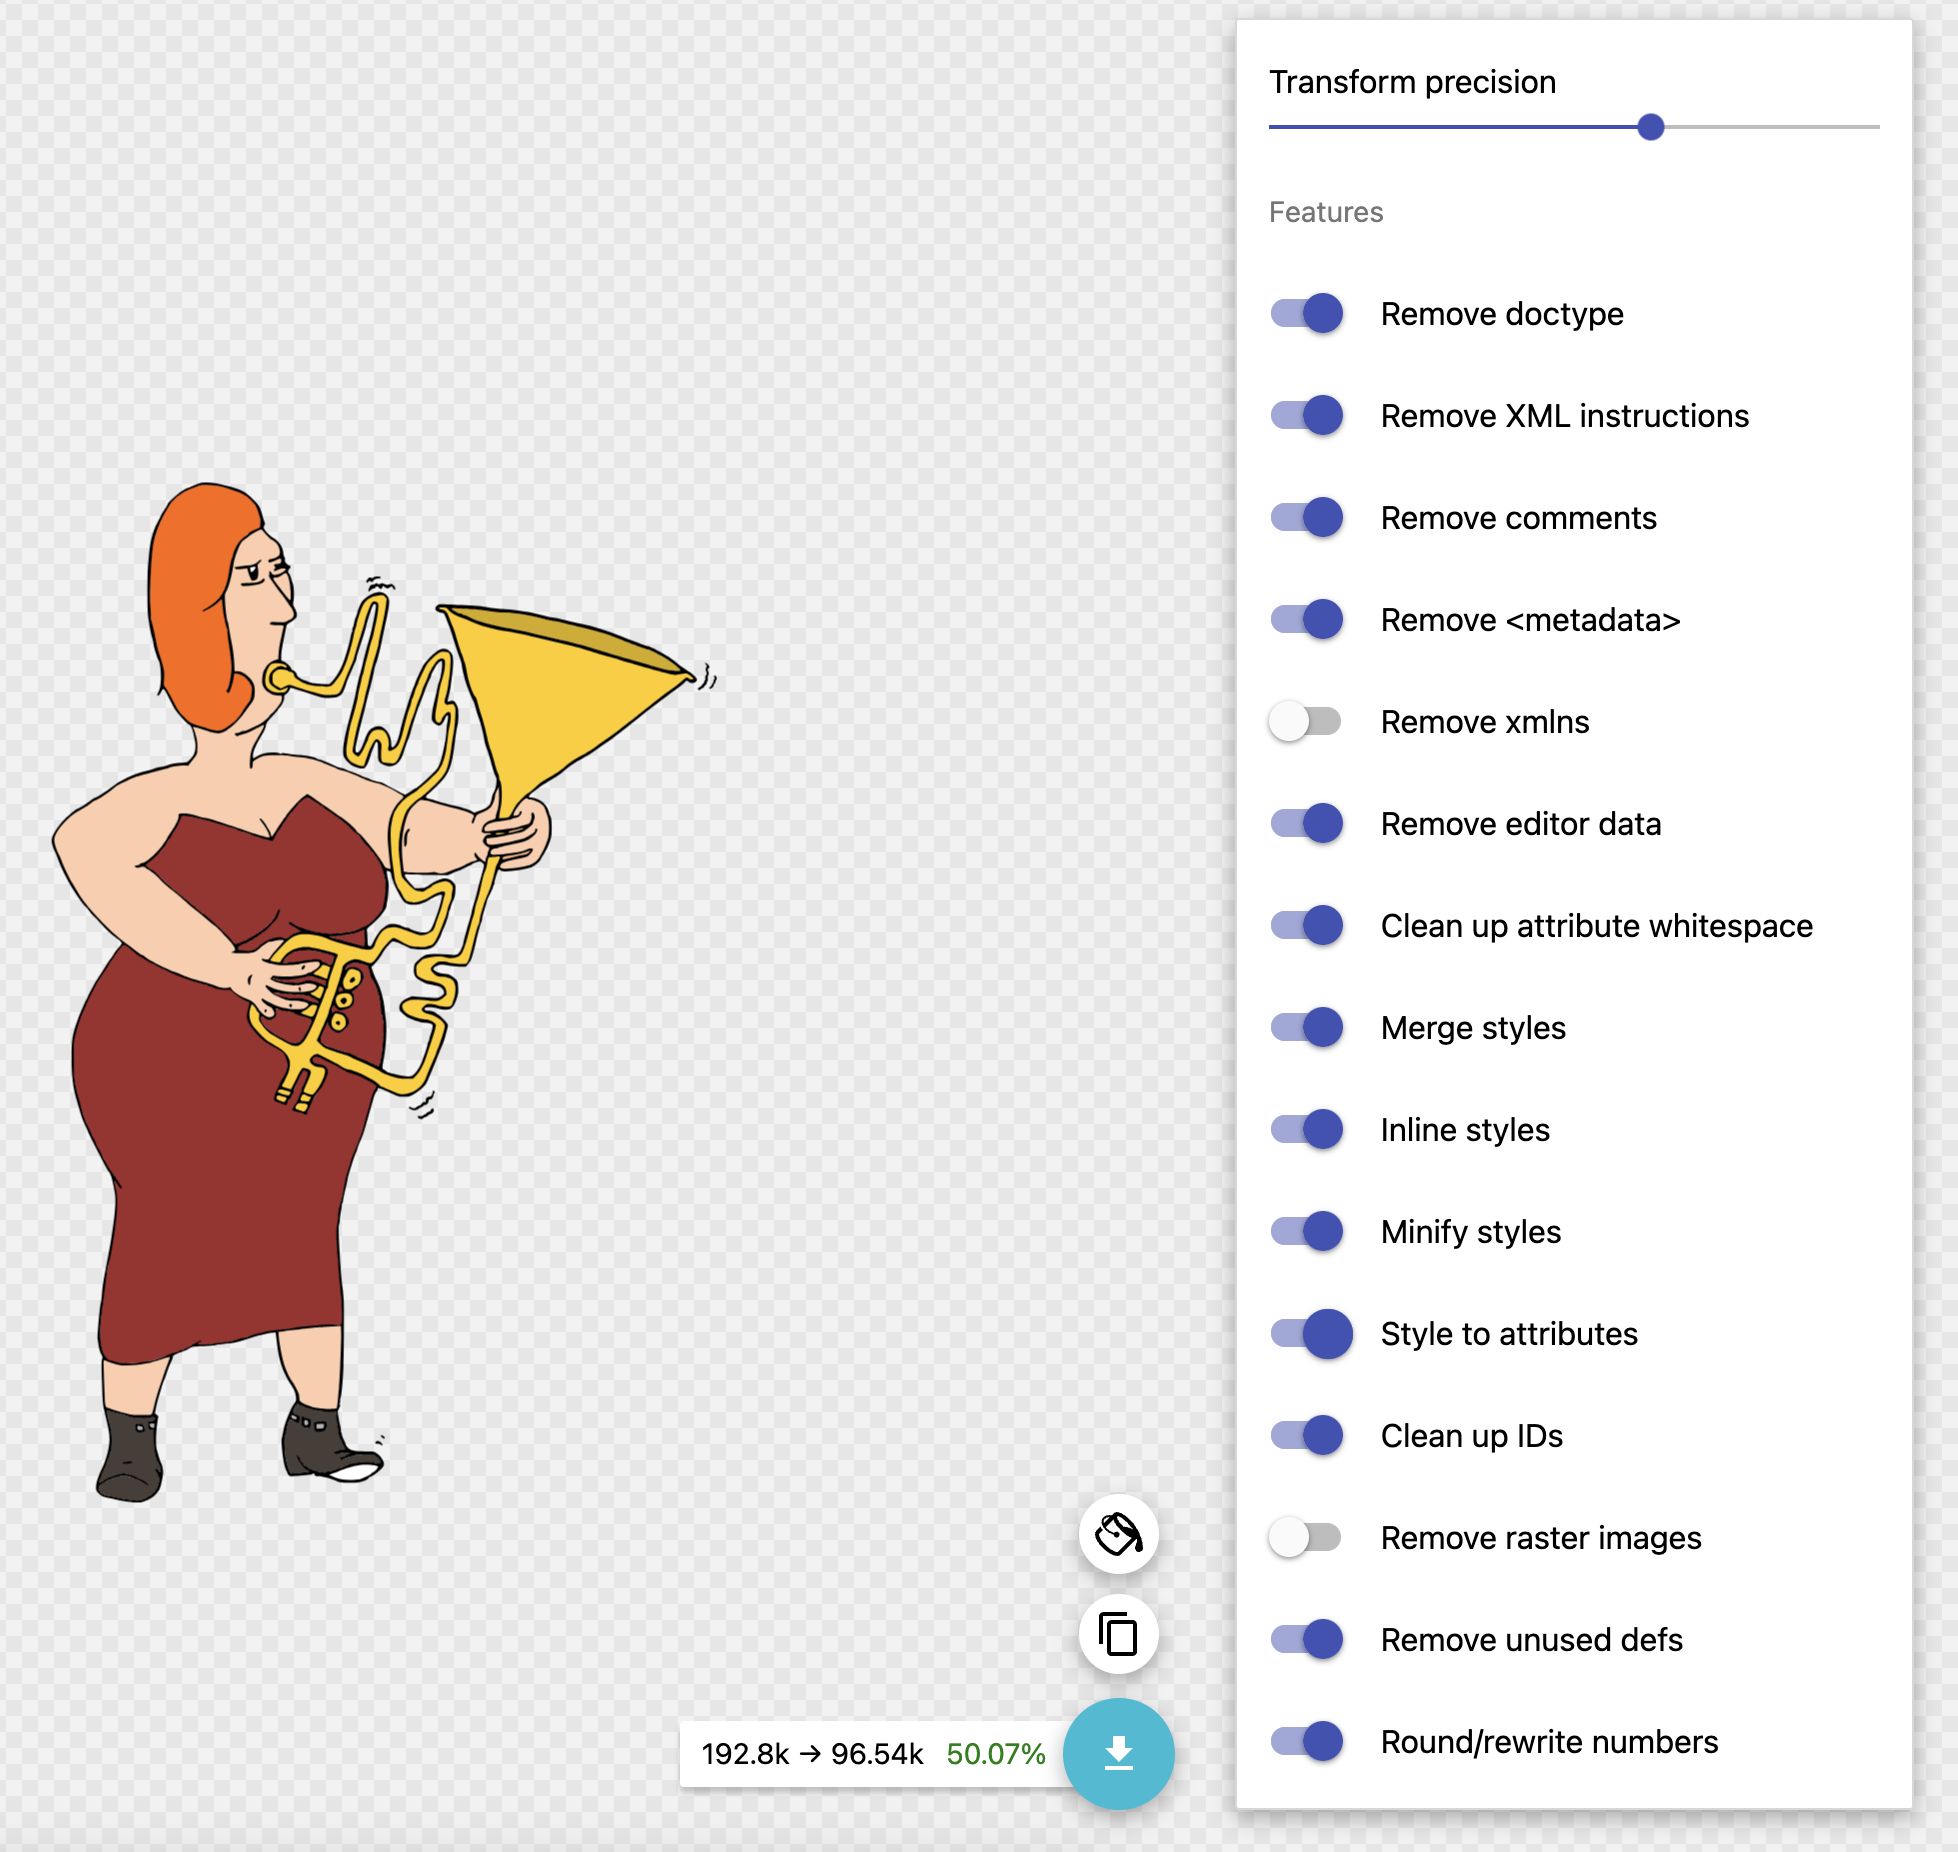
Now we need to add this Plugin to our config file but first we need to know what’s the name of this plugin. Let’s find it in this plugins list. We see that convertStyleToAttrs is the one that we need. After adding it to the config file, it will look like below:
Now we are all set to run the svgo cli command to optimize our SVG file locally:
svgo -f ./src/assets/images -o ./src/output --config ./svgo.config.mjs
The above command prints following optimization metadata:
Great! Now our locally optimized SVG matches what we have on the web editor. Let’s try this optimized SVG in our react-native app and see how it affects the rendering time.
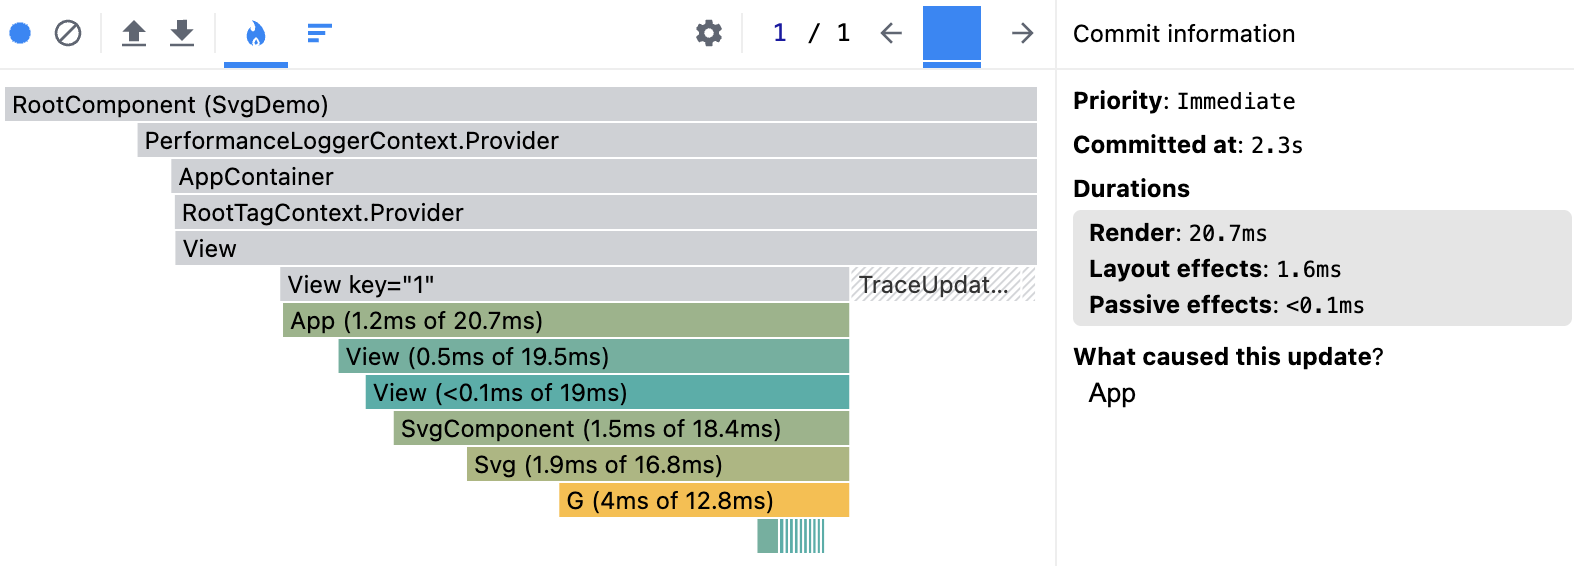
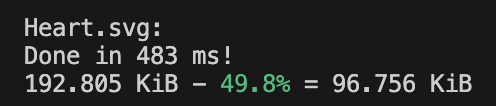
Nice improvements. Our SVG now takes ~18 ms to render, previously it was taking ~36 ms to render so that’s almost 50% improvement in the rendering time. Great news is that we also have our SVG reduced to halve the size it was. If you recall, our SVG was 192 KB and now it is 96 KB 🎉
Automation
It is great to achieve what we have achieved now, but there is one downside. Each time we add a new SVG to our codebase, we will have to re-run the SVG optimization again and replace the optimized SVGs. We can improve this by having a GitHub workflow, where we can use svgo cli as we are using now and implement custom script which would compare the output printed by svgo cli. If it’s a significant improvement, we will use the optimized files. Now, you can easily tell this is going to be time-consuming.
To help us out, there’s an open-sourced GitHub action that we can use to automate optimizing images for us. It’s called Imgbot and it offers great developer experience. For open-source projects, it is free. It uses svgo cli under the hood for optimizing SVGs and it also offers optimizing other image formats like PNG and JPEG. That’s great news!
But that’s not all. Imgbot creates a PR when you set it up for the first time, and that PR contains assets that have been optimized. Also, Imgbot will automatically create a PR with optimized images, whenever it detects new images added to the repo. To see how it looks in action, we can take a look at an open-source project, Expensify. Here’s an example of Imgbot automatically creating a PR with optimised images.
Conclusions
Actions like these yield valuable results in the long run and fall under the category of 'Small Effort, Big Impact.’ When you’re starting a project and are aware of such beneficial tips, your application will be safeguarded to keep the APK size and startup time lower when it comes to the image assets. We encourage you to try this out and share with your team to bring invaluable results to your projects.


Learn more about Performance
Here's everything we published recently on this topic.