A Deep Dive Into React Native Reanimated v1
To provide users with smoothly working apps, we want our animations to run at 60 fps or even better. However it may sound like a bit of a challenge, with an Open Source library called <rte-code>react-native-reanimated<rte-code>, we can do it!
In this article, I'll describe to you what React Native Reanimated is and how it works under the hood basing on three use cases.
What is React Native Reanimated?
React Native Reanimated is an Open Source library used in React Native mobile development to create smooth animations and interactions that run on the UI thread. The library allows developers to declare animations on the JavaScript thread and run them on the native one to achieve smooth animations regardless of whether the JS thread is busy or not.
Despite being really powerful, the library has a very steep learning curve. First of all, we have to learn a specific language in order to build animations.
Second of all, we have to change our mindset and start thinking declaratively instead of imperatively.
It can be difficult to wrap your head around this style of building animations at first. That's why I will dive deeply under the hood of this library what, hopefully, will help you understand how it works and what idea stands behind it.
The idea behind Animated components
At first, I want you to understand what the purpose of rendering <rte-code><Animated.View/><rte-code> is and why we can use <rte-code>Animated.Node<rte-code> values in the <rte-code>style prop<rte-code>.
The example code snippet below uses <rte-code>Animated.Node<rte-code> to set the <rte-code>opacity<rte-code> (it is an instance of the <rte-code>Animated.Node<rte-code>) style property of the <rte-code>Animated.View<rte-code>.
Let's go through it, step by step.
At the beginning of our component, we are creating <rte-code>Animated.Value<rte-code> node with an initial value equal to <rte-code>1<rte-code> that represents <rte-code>opacity<rte-code>.
At first, we render <rte-code>Animated.View<rte-code> and we start building our animation tree on both JS and native sides at the same time. To avoid flickering, before sending our nodes, we calculate initial values on the JS side and library by using <rte-code>setNativeProps<rte-code> method to set these values directly as component props. The way how we calculate values on both JS and the native side is very similar.
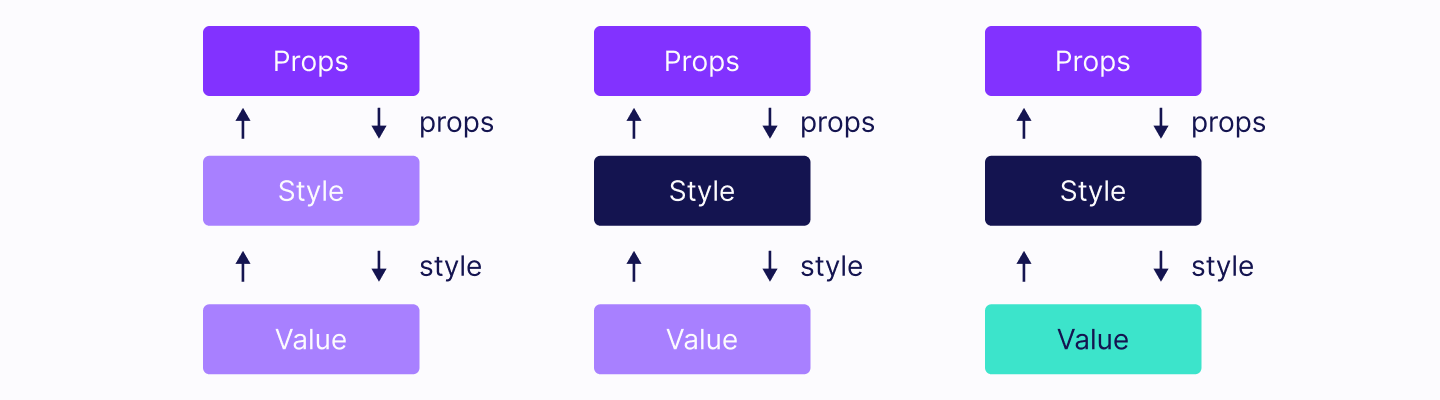
In the diagram below, we have our animation tree that is replicated on both sides (native and JS).
Note: All diagrams below represent animated nodes not props in React.

As you may already observe, nodes have a bidirectional connection. It means that the node can be accessed by going deeper into the tree (from parent) or by going upwards to the parent (from children). This technique is crucial for the animation tree evaluation process that will be described below.
The building tree process uses the bottom to top approach. It means that: <rte-code>Props<rte-code> node wants to be attached to the tree but it requires its children to be attached before. <rte-code>Value<rte-code> node will become the eldest ancestor (in our case it is the root of our animation tree). It's children's will to inform that they should be evaluated in the next loop tick.

Then, all marked nodes and their children will be processed in the next loop tick. In this step, we want to find all affected final nodes by searching through marked children nodes. Final nodes are one of these types: <rte-code>Props<rte-code> or <rte-code>Always<rte-code> (we will cover it later on). Nodes are evaluated recursively from the top to bottom (starting from the final nodes). That's why this bidirectional connection is crucial in order to make this process work correctly.
In our case, the Props node will evaluate <rte-code>Style<rte-code> node and <rte-code>Style<rte-code> node will evaluate <rte-code>Value<rte-code> node. The Value node will return actual held value that will be used by its parent and so on.
After all the updates, the library is taking care of UI updates on the native side therefore new values will be visible for the end users.
What about a more interactive/real-world example?
How to trigger animations?
To make an animation run, we have to trigger it, it's quite obvious. In this chapter, I will describe two way sof triggering animations in React Native Reanimated library - by using <rte-code>setValue<rte-code> and by running <rte-code>Clock<rte-code>.
Animation triggered by setValue
We're going to start from the ground up. Together we'll deeply analyze a popular fade out animation that should be triggered once the button <rte-code>Hide<rte-code> has been pressed.
The only change from the previous example is that once we have pressed the <rte-code>Hide<rte-code> button then our <rte-code>Animated.View<rte-code> immediately disappears. What happened here? Look at the diagram below.
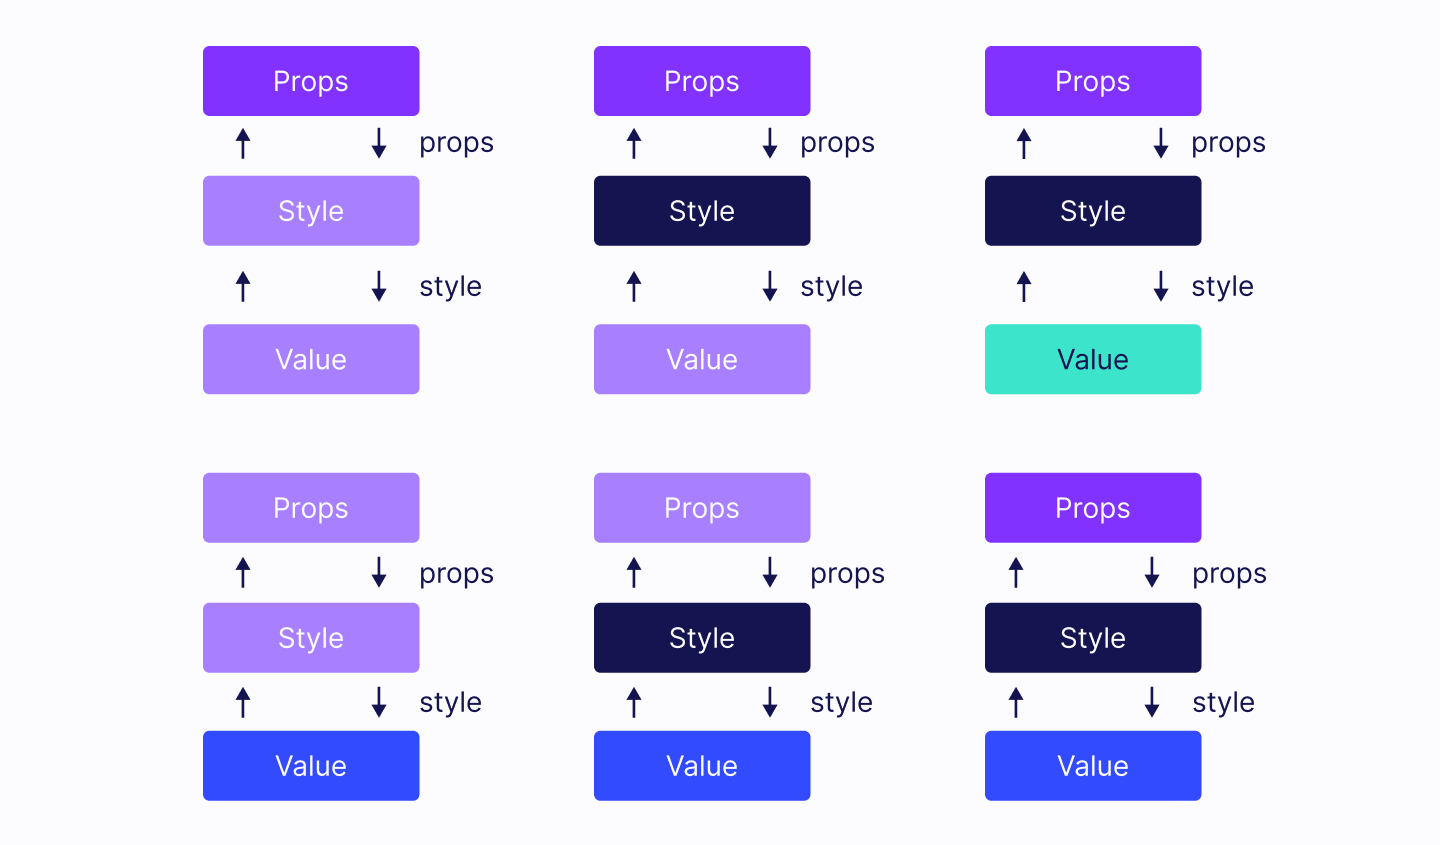
<rte-code>Value<rte-code> node informs that its value has been updated. As a result of that, all its children should be re-evaluated. Node manager will find our <rte-code>Props<rte-code> final node and start re-evaluation from there. In the end, re-evaluated <rte-code>Props<rte-code> node will be used for the UI updates.
Okay, but there was no animation at all right? Currently, we only know one way for triggering updates. It is done by calling setValue method directly on the <rte-code>Animated.Value<rte-code>.
Triggering animation by running Clock
We have to update our example a bit in order to make an actual animation.
There are few things that need in-depth explanation so let's go through it step by step:
- We create a counter variable that is used only for resetting animation state (triggering re-render)
- We create a <rte-code>startAnimation<rte-code> that is an instance of <rte-code>Animated.Value<rte-code> .It will be used to trigger an animation once Hide button has been pressed.
- We create an <rte-code>opacity<rte-code> as in the previous example.
- We create a <rte-code>clock<rte-code> variables that is an instance of <rte-code>Animated.Clock<rte-code>.
- We create <rte-code>state<rte-code> object that holds animation's state.
- We create <rte-code>config<rte-code> object that holds animation's config.
- We use <rte-code>useCode<rte-code> hook in order to define our animation tree and attach it properly. Under the hood returned value is wrapped up with <rte-code>Always<rte-code> node (second kind of final node).
Let's look at the diagram below to see what's going on here.
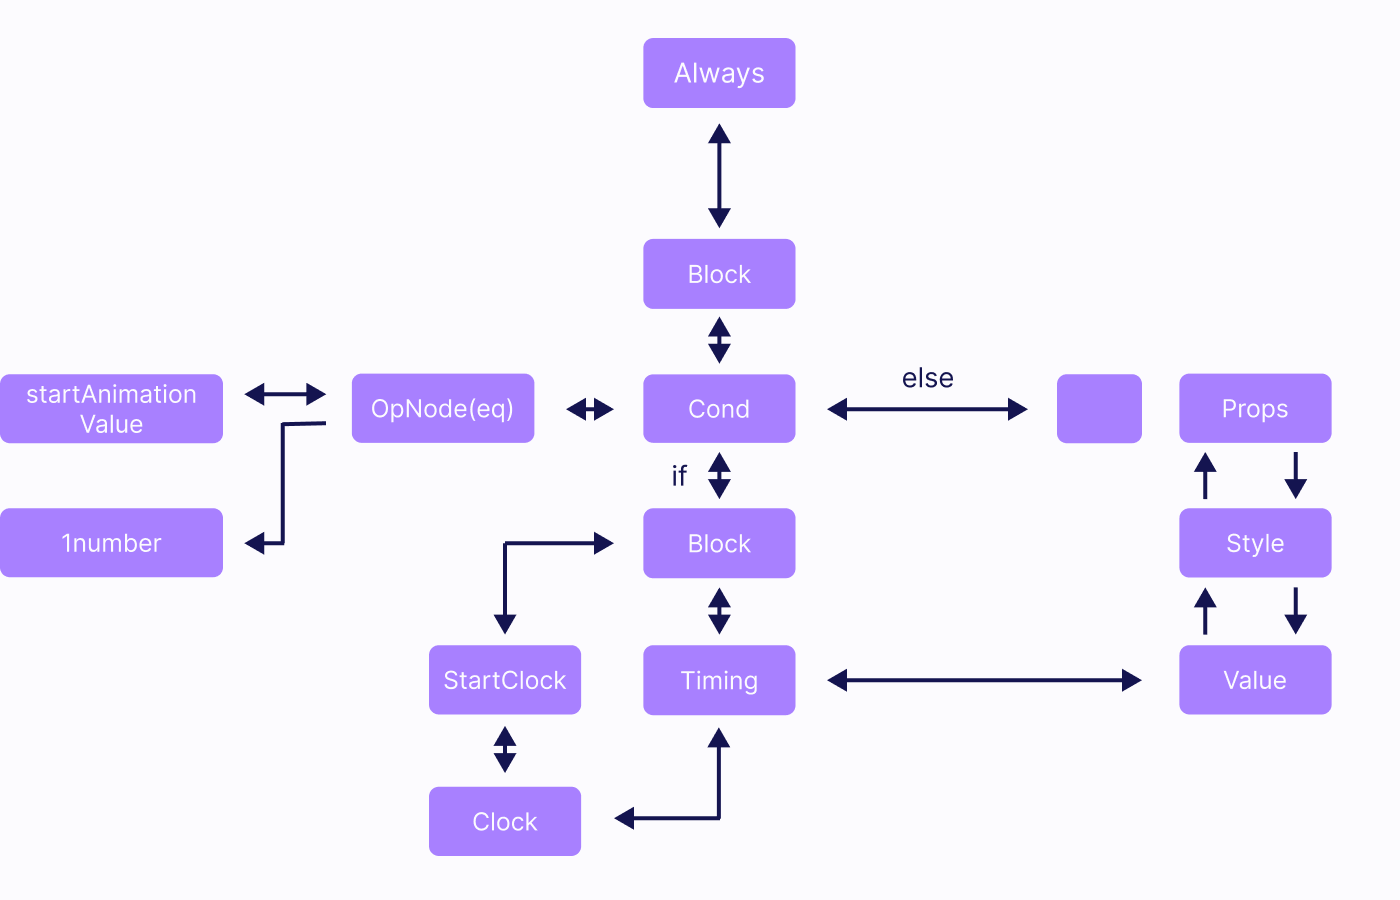
This is our simplified animation tree (timing isn't a node itself it just groups up more nodes like <rte-code>Set Cond<rte-code> etc.). It also links our previous animation tree therefore updating <rte-code>Value<rte-code> (later on) will cause <rte-code>Props<rte-code> to trigger re-evaluation as well.
Once <rte-code>Hide<rte-code> button has been pressed. we set <rte-code>startAnimation<rte-code> value to 1. This node will notify node manager that it should be updated in the next loop tick . The node manager will go through children until it finds <rte-code>Always<rte-code> node (final node) which will start re-evaluation of the whole subtree.
Finding final nodes phase:
Evaluating Always node phase:
- <rte-code>Cond<rte-code> node will be evaluated to <rte-code>true<rte-code>
- <rte-code>StartClock<rte-code> will be evaluated and it will start <rte-code>Clock<rte-code> node which will notify nodes manager that it should be taken into consideration in each loop tick until it will be stopped by <rte-code>StopClock<rte-code> node.
- Our invented <rte-code>Timing<rte-code> node will update Value node and this node will be processed in the next loop tick.
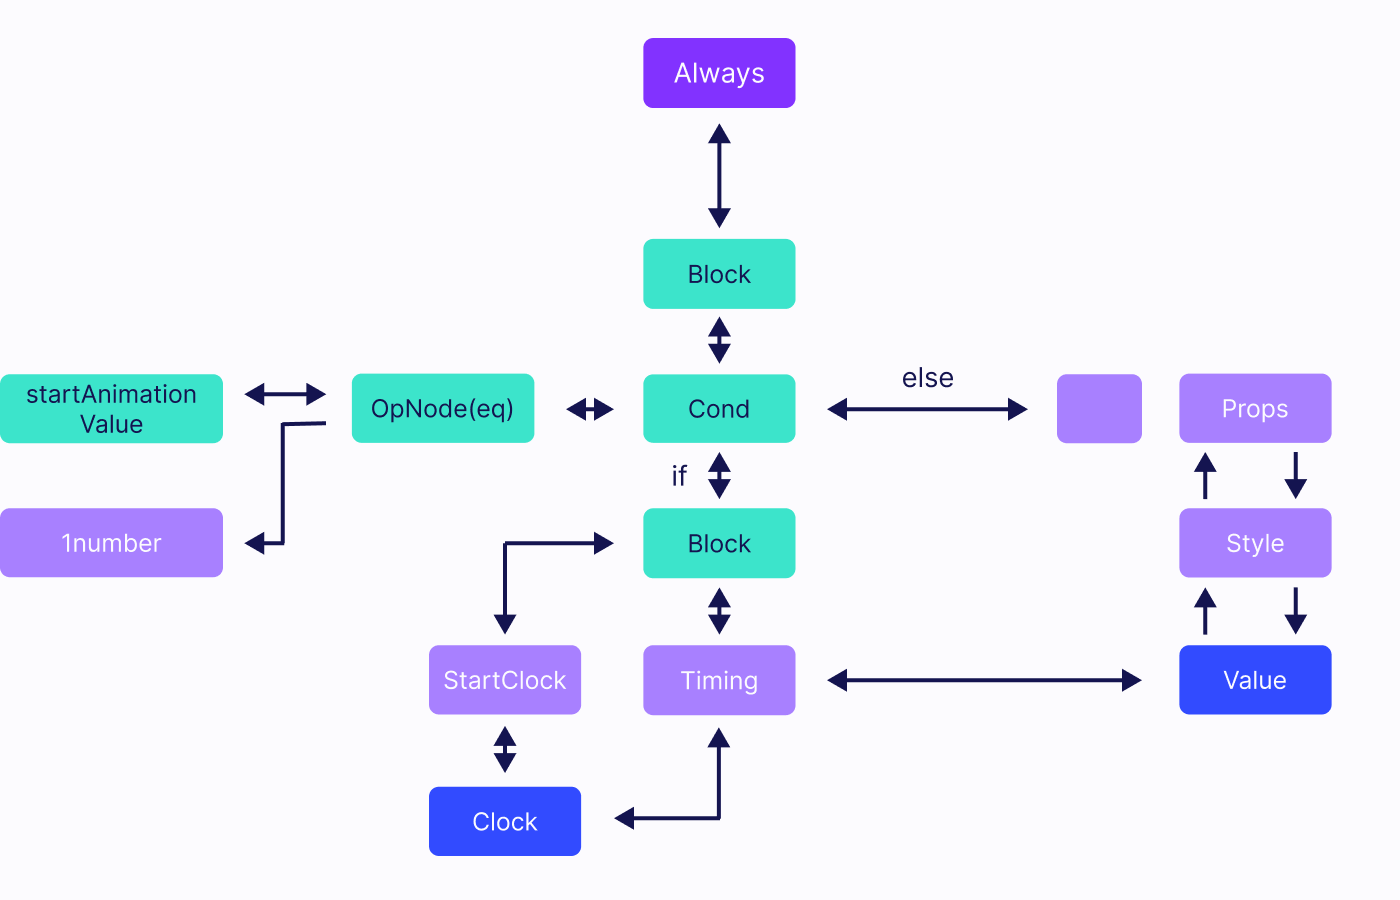
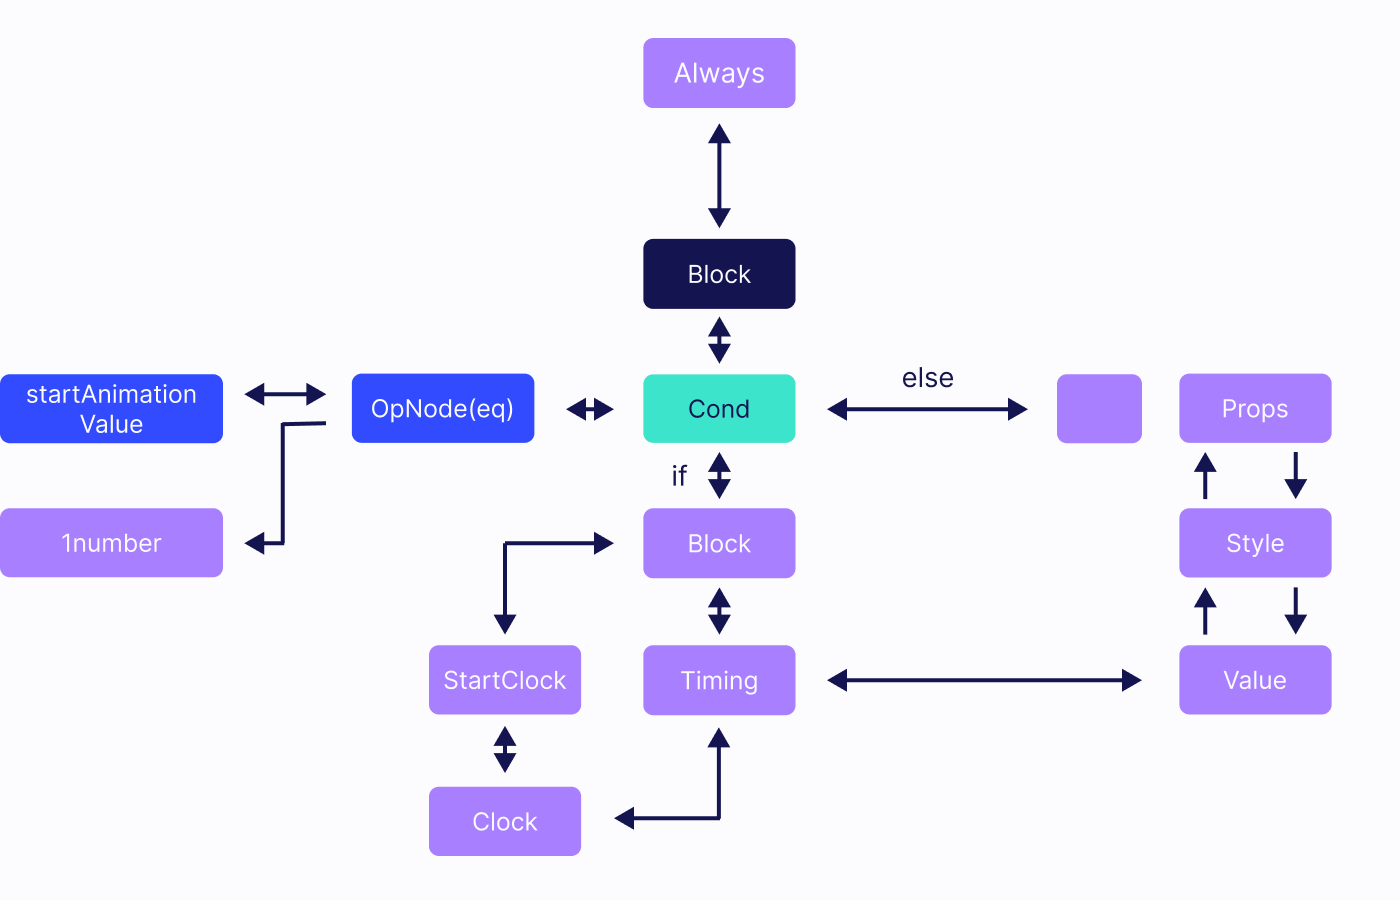
Nodes that notified the nodes manager are marked with red color. The final nodes found, which are <rte-code>Always<rte-code> and <te-code>Props<rte-code>, are marked in yellow.

After that, the process is repeated and new values of <rte-code>Value<rte-code> node are calculated by <rte-code>Timing<rte-code> in each animation loop tick and update <rte-code>Value<rte-code> node itself. On each frame <rte-code>Clock<rte-code>, while it is running, it will notify nodes manager and as a result again <rte-code>Always<rte-code> and <rte-code>Props<rte-code> nodes will be found and then evaluated.
Summary
As you can see, the new language may seem unintuitive but offers many possibilities. To create smooth animation with this language, we need to change our mindset - from imperative to declarative and get used to <rte-code>Clock<rte-code>, which is essential for triggering animations in desired scenarios and under the assumed conditions.
If you'd like to read more about the React Native Reanimated v1 library, check out the official docs.
And that's all for today. As the v2 is already live, stay tuned for more articles about React Native Reanimated library!To provide users with smoothly working apps, we want our animations to run at 60 fps or even better. However it may sound like a bit of a challenge, with an Open Source library called react-native-reanimated, we can do it!


Learn more about Animations
Here's everything we published recently on this topic.