
Covering your code with tests can be very helpful for increasing the overall reliability of your app. However, while testing your product is vital, it is not the only prerequisite on your way to shipping faster and with more confidence.
What is equally important is how quickly you detect the potential regressions and whether finding them is a part of your daily development lifecycle. In other words – it all comes down to the feedback loop.
Issue: A lack of CI or an unstable one means a longer feedback loop – you don’t know if your code works, and you cooperate slowly with other developers.
For better context, let’s take a look at the early days of the development process. When you’re starting out, your focus is on shipping the first iteration (MVP) as fast as possible. Because of that, you may overlook the importance of the architecture itself. When you’re done with the changes, you submit them to the repository letting other members of your team know that the feature is ready to be reviewed.
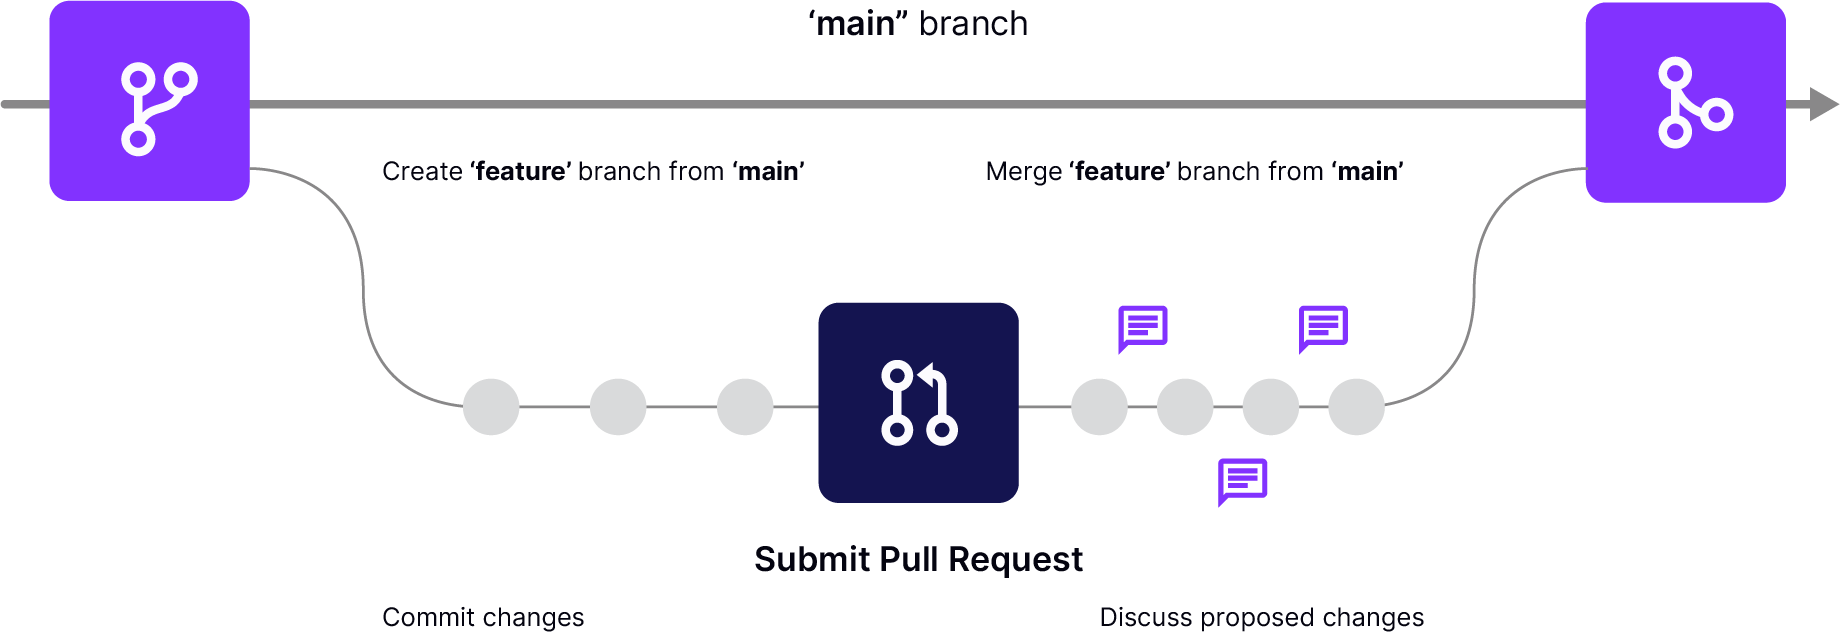
While this technique can be very useful, it is potentially dangerous on its own, especially as your team grows in size. Before you’re ready to accept a PR, you should not only analyze the code but also clone it to your environment and test it thoroughly. At the very end of that process, it may turn out that the proposed changes introduce a regression that the original author hasn’t spotted.
The regression can occur because we all have different configurations, environments, and ways of working.
It’s harder to onboard new members to your organization. You can’t ship and test PRs and different contributions as they happen.
If you’re testing your changes manually, you’re not only increasing the chances of shipping regressions to production. You’re also slowing down the overall pace of the development. Thankfully, with the right set of methodologies and a bit of automation, you can overcome this challenge once and for all.
What is Continuous Integration and how does it work?
This is when Continuous Integration (CI) comes into play. CI is a development practice where proposed changes are checked into the upstream repository several times a day by the development team. Next, they are verified by an automated build, allowing the team to detect changes early.
The automated builds are performed by a dedicated cloud-based CI provider that usually integrates from the place where you store your code. Most of the cloud providers available these days support GitHub, a Microsoft-owned platform for collaborating on projects that use Git as their version control system.
CI systems pull the changes in real-time and perform a selected set of tests to give you early feedback on your results. This approach introduces a single source of truth for testing and allows developers with different environments to receive convenient and reliable information.
Using a CI service, you not only test your code but also build a new version of the documentation for your project, build your app, and distribute it among testers or releases. This technique is called Continuous Deployment and focuses on the automation of releases.
Using a Continuous Integration provider to build your React Native app
There are many CI providers to choose from, and you can pick the one best suited for your project needs, or even use a combination of CI tools. Circle CI and GitHub actions are generic CI providers with expansive capabilities that also span outside of mobile app development. On the contrary, Bitrise specializes in services used in mobile app development, and EAS specializes specifically in building and deploying React Native projects.
Solution: Use a CI provider such as Circle CI or eas build to build your application. Run all the required tests and make preview releases if possible.
We have selected CircleCI as our reference CI provider for the purpose of this article as it has broad community adoption. In fact, there is an example project demonstrating the use of CI with React Native. We will employ it later in this section to present different CI concepts.
After this overview, we will show you how to alternatively set up EAS on your React Native project, and use it to build your native iOS and Android bundles for development, preview, and production.
A rule of thumb is to take advantage of what React Native or React Native Community projects already use. Going that route, you can ensure that it is possible to make your chosen provider work with React Native and that the most common challenges have been already solved by the Core Team.
How to set up CI with CircleCI
As with most CI providers, it is extremely important to study their configuration files before you do anything else.
Let’s take a look at a sample configuration file for CircleCI, taken from the mentioned React Native example:
The structure is a standard Yaml syntax for text-based configuration files. You may want to learn about its basics before proceeding any further.
Many CI services, such as CircleCI or GitHub Actions, are based on Docker containers and the idea of composing different jobs into workflows. You may find many similarities between such services.
Commands, jobs, and workflows in CircleCI configuration
These are the three most important building blocks of a CircleCI configuration: commands, jobs, and workflows.
A command is nothing more than a shell script. It is executed within the specified environment. Also, it is what performs the actual job in the cloud. It can be anything, from a command to install your dependencies, such as yarn install (if you’re using Yarn) to a bit more complex one ./gradlew assembleDebug that builds Android files.
A job is a series of commands - described as steps - that is focused on achieving a single, defined goal. jobs can be run in different environments, by choosing an appropriate Docker container.
For example, you may want to use a Node container if you need to run only your React unit tests. As a result, the container will be smaller, have fewer dependencies, and will install faster. If you want to build a React Native application in the cloud, you may choose a different container, e.g. with Android NDK/SDK or the one that uses OS X to build Apple platforms.
To help you choose the container to use when running React Native tests, the team has prepared a react-native-android Docker container that includes both Node and Android dependencies needed to perform the Android build and tests.
In order to execute a job, it has to be assigned to a workflow. By default, jobs will be executed parallelly within a workflow, but this can be changed by specifying requirements for a job.
%2525252520Improve%2525252520Your%2525252520React%2525252520Native%2525252520Apps_-1.png)
You can also modify the jobs execution schedule by adding filters, so, for instance, a deploy job will only run if the changes in the code refer to the main branch.
You can define many workflows for different purposes, e.g. one for tests that would run once a PR is opened, and the other to deploy the new version of the app. This is what React Native does to automatically release its new versions every once in a while.
Expo Application Services (EAS)
EAS is a set of deeply integrated cloud services for Expo and ReactNative apps, built and maintained by the team behind Expo. The three most popular services it includes are:
- EAS Build: a cloud service that helps you build React Native app bundles
- EAS Submit: a cloud service that lets you upload your built app bundles directly to TestFlight on the Apple App Store and your preferred track on the Android Google Play Store
- EAS Update: a service to deliver over-the-air (OTA) updates to React Native apps
In this section, we will focus on EAS Build. As mentioned above, EAS highly specializes in providing the fastest and most seamless experience for building React Native apps. To provide the best developer experience, EAS Build already has the iOS and Android development environments pre-configured, and it comes with built-in support for all the more popular package managers including npm, yarn, pnpm, and bun.
One benefit of using EAS to build your React Native apps, is that because it’s a cloud service, you can trigger the app builds from a Mac, Windows, or even a Linux machine and download the build directly to your development device. This means you could for example develop an iOS app on a Windows machine, getting around the Apple restrictions of needing to own a Mac in order to build a native iOS app.
Another benefit of using EAS for building your React Native apps is that you get build caching for your JavaScript, Android, and iOS dependencies out of the box with no configuration needed.
Setting up EAS Build
To set up EAS Build in an existing React Native app, you’ll first want to install the EAS cli:
npm i -g eas-cli
You’ll also need to create an Expo account if you don’t already have one, and log in on the cli:
eas login
To create app builds that run on real devices, you will need to configure build signing: this means generating keystores for Android and Provisioning Profiles and Certificates for iOS.
One of the perks of using EAS is that it comes with a cli tool that can automatically create and update all of your build credentials for you. The CLI prompts you to do this when you configure your first build, or you can also manage the credentials without triggering a build by running the eas credentials cli command.
After installing the CLI and logging in, run the following in the root directory of your project:
eas build:configure
This will add the eas.json file to the root directory of your project:
The eas.json file will contain all the configuration needed to build your app on EAS. By default, it will come with 3 build profiles: development, preview and production:
- development: ''distribution'': ''internal" in the development profile means that the build will be downloadable via a link, and ''developmentClient'': true enables the dev menu, allowing the JavaScript to be bundled separately. This is the build you’d want to use for local development.
- preview: the preview build will also be downloadable via a link, but it does not include the dev client. This means it will come with one JavaScript bundle and cannot be used for local development. It is best used to test or preview your production app before you submit it to the stores.
- production: this creates the production apps you can upload to the Google Play and Apple App Stores.
You can always add additional profiles as needed. For example, you could add a separate build profile for creating an iOS app that can run on a Simulator:
As seen above, each profile can have additional platform-specific configurations, though most of the time the configuration will be shared. See the eas.json reference for all available configuration options.
Running your build on EAS Build
Any build configured in eas.json can be triggered with a single command. For example, if you want to build the app for local development, run:
eas build –profile development
The CLI will prompt you whether you want to build the iOS app, Android app or both. The development build has ''developmentClient'': true, meaning it can be used for local development. You won’t need to rebuild it again unless you add any native code or packages. Once you’ve created a build, you can use Expo Orbit to install and run builds from EAS or local files on simulators and physical devices.
To use a different build profile, for example, the preview build, you can run the same command with --profile preview:
eas build –profile preview
Once the build is complete, the CLI will print out the URL for the build, and any member of your team can download the app to their device.
To automate this workflow, you could configure EAS to build from GitHub with the Expo GitHub App.
While EAS is primarily used for building and submitting your native apps to the stores, it also supports running E2E tests as part of your workflow.
Benefits: You get early feedback on added features and swiftly spot the regressions. Also, you don’t waste the time of other developers on testing the changes that don’t work.
A properly configured and working CI provider can save you a lot of time when shipping a new version of an application.
%2525252520Improve%2525252520Your%2525252520React%2525252520Native%2525252520Apps_.png)
By spotting errors beforehand, you can reduce the effort needed to review the PRs and protect your product against regressions and bugs that may directly decrease your income.
Interested in improving your React Native app?
We are the official Meta partners on React Native. We’ve been working on React Native projects for over 5 years, delivering high-quality solutions for our clients and contributing greatly to the React Native ecosystem. Our Open Source projects help thousands of developers to cope with their challenges and make their work easier every day. Our React Native development company offers a wide range of services.
Contact us if you need help with React Native or cross-platform development. We will be happy to provide a free consultation.


Learn more about CI/CD
Here's everything we published recently on this topic.


