Continuous Delivery - Integration for Everyone
You know what I’m talking about: you send PR into your favorite (or even your own; or ideally both at the same time) project. And after a few seconds, you can see a beautiful report of what have you done wrong.
Honestly, there are plenty of information out there on the internet about these topics. It’s not my goal to write it everything once more. Why so, right? Let’s take another approach. I’m going to point you in the right direction and at the end of the day, hopefully, you will be able to tame CI/CD as well.
Case study
I’m going to describe a little bit simplified version of a use-case of a real client of Callstack that I had the honor to work with. The project itself is React Native application for both Android and iOS. But a lot of the knowledge I’m going to share, you can easily use with web projects too. (It will be probably even easier to setup, so keep reading). The code was hosted on GitHub (feeling blessed once more!) so the choice of the proper CI service was obvious: CircleCI or Travis CI. Both are great services but I’ve picked CircleCI because I’m already familiar with the workflows I’ll describe later.
The next important step is to decide what we want to achieve in the first place. Our requirements were quite simple. We want to establish a simple (yet effective) workflow. Let’s have a master branch and from that branch, each programmer should spin off his functionality. Once all checks are successful we should be able to merge PR into master branch and then additional (deploy) jobs are going to be run.
.webp)
Yeah, a lot of you could say that GitFlow is more robust — but let’s start with a small, we can enhance it anytime. We want to get things done™ at the first place.
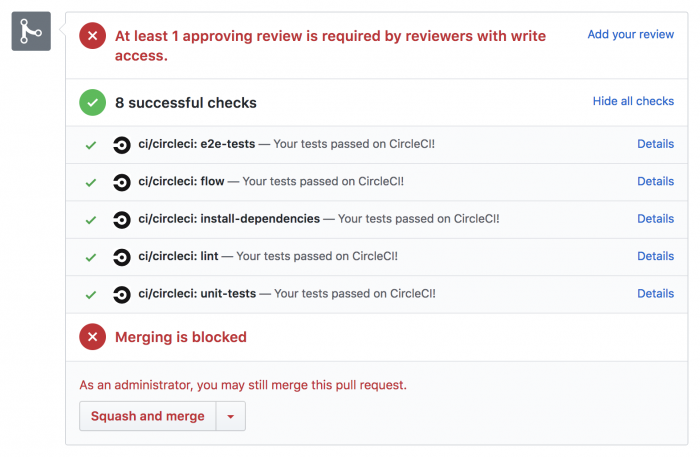
It should work exactly as I’ve illustrated on the diagram. I will create a PR with my awesome functionality and CircleCI should be able to check code for:
- FlowType
- ESlint issues
- Basic unit tests powered by Jest
And eventually, run Danger.js. Danger.js? You know, sometimes you want to also check that PR creating new UI element contains image, that you haven’t left sloppy console.log and etc. — that’s a job for Danger.js, but let’s talk about this later.
OK, that would be enough. The next and the last yet important flow would be when the PR will be merged into the master branch. Then we would like to run another job on the CircleCI — deploy iOS and Android version to our alfa testers and inform everyone on the Slack channel that some sweet is coming directly into their devices. What? Wait a second. How?
Good question. We ended up with App Center service. It’s lovely service, it supports distribution to testers, crash logs, analytics and even more out of the box. The distribution is just simple as it can be and you can also send your app to the Stores directly from it. The next thing we need to think about is who is going to build our app for distribution. If you are using Metro bundler you are safe and you can completely rely on App Center because it works out of the box as CI. As we are using Haul — our homegrown Webpack-based builder for React Native — it would be better for us introduce our own building process. For that, we are going to use Fastlane to automate the mess around certificates, provisioning profiles and everything — especially on iOS side. So, what do you think? Sounds like a plan, doesn’t it? Let’s jump directly into it!
Circle CI configuration
The first what we have to do is set up a project on CircleCI, it should be easy. Go into Circle CI / Add Project and click on your lovely project. Now the fun comes into play. CircleCI is easily configurable via special YAML file living inside of your repository as .circleci/config.yml so let’s create one.
As I mentioned before, if you are using Metro bundler you can ignore both android_defaults and ios_defaults — you can set the building (triggered with every merge to the master) easily in App Center UI. That’s not our case, though, because we rely on Haul. Once we have configured our defaults for the jobs (check out the terminology) we should configure the jobs as well.
This part should be quite self-describing. We have just defined the job for:
- Installing dependencies (along with caching)
- ESlint check
- FlowType check
- Jest — for unit testing (along with caching)
Now we have to define the job for iOS and Android deployment.
As you can see in those jobs we rely on Fastlane tool. We are going to dive more into it the next chapter. Let’s wrap it everything together and create a workflow for that two paths: when someone creates PR and when the PR is merged.
It should look like this. I’ve tried to place comments here and there so I hope you can fight it through. The only question is what’s the magic and mysterious Fastlane, we will get to it in the next chapter. Here is a full configuration what we’ve used so far. Now brace yourself we are going to dive in into the best tool what happened to mobile developers since… the creation of the universe probably. The mighty Fastlane.
Fastlane
If you don’t know what’s Fastlane, I will try to briefly describe it. Basically, without any unnecessary buzzword, it’s a deployment automation tool which does the job just right. You probably know how painful is to deal with certificates and provisioning profiles on iOS, so we’ll use Fastlane to simplify this for us. I mean, certificates and provisioning profiles are not that hard — updating them and sharing across the team is. That’s the time when matchsteps in.
We are going to build an application, send binary to App Center and notify our Slack channel that another version of our awesome app is on its way. Fastlane created concept of lanes which is basically in common language a fancy way how Fastlane calls its plugins. There are many of them preinstalled so you can use it right away. For us, it will be Match on iOS side and Gradle for Android, but it’s not everything at all. There are actions for taking screenshots, running tests, deploying to TestFlight, and many more, check out the list by yourself on Fastlane docs. We want to keep our example configuration simple so we will be good just with match+gym, gradleandslack. We all will use 3rd-party plugin for App Center called simply appcenter so you have to also obtain an API token for it.
To proceed we need to install Fastlane. It should be pretty straightforward as brew cask install fastlane. Once you will be done go to ios and androidfolder of your project and at both places run fastlane init
- For iOS choose 4) Manual setup option, the rest of it I’ll cover in following paragraphs so stay with me. 💪
- For Android, you will be asked for package name so don’t forget to type your correct bundle id. Question regarding path to json secret you can ignore it, we don’t need it for our case.
The last thing that you need to do is run fastlane add_plugin appcenter in both directories as well. Now we should be ready for actual configuration.
iOS
The iOS is, as I said above, a little bit trickier regarding the signing of binary. However match will solve the problem for us. Match actually sync our certificates and provision profiles using git. Thus your whole team could access correct configuration and even more. Match can create new provision profiles or certificates that you require for specific build. This is especially convenient for CI because you don’t need to upload your certificates to it — everything is stored in git hashed by passphrase that you choose at the beginning.
Fastlane operates based on two files: Appfile and Fastfile. Before we proceed to configure Match we should update our Appfile as well.
If you are done with Appfile editing, we can start with Match. All you have to do is to follow the official instruction:
- Create private repository
- Run fastlane match init
You will be asked for a password to the user you’ve just configured as apple_id. If everything went OK you can test your very new configuration by running fastlane match adhoc, where adhoc means we want to use ad-hoc certificate, the one we need for App Center.
If you are positive about it — we have big part of our quest behind us. Good.
Now go ahed and open fastlane/Fastlane. We want to achieve configuration similar to this.
The commands are (I hope) self-describing and you call always look them up on Fastlane website. However, we need to focus on some additional setting on Circle CI side, namely, we need to set few env variables.
- MATCH_PASSWORD should be set to match your passphrase what you have set during the Match initialization
- SLACK_URL what should be Slack’s incoming web-hook URL.
- FASTLANE_PASSWORD password to theapple_id user
If you did so, you should be all set. Now it’s time to test it. Navigate intoiosdir of your project and run fastlane beta and let’s see what happens. If everything went OK you should be able to see a success message on your Slack channel. If you do not, and I really hope that this wouldn’t be your case, write me in the comments, I’ve might be able to help you.
Android
Actually, to make our build pass in App Center, we need to sign it as well. Fortunately for us, it’s much easier and we can persist key inside of our repo. Signing is quite well described on Android website. Open your project in Android Studio and navigate to File > Project Structure.
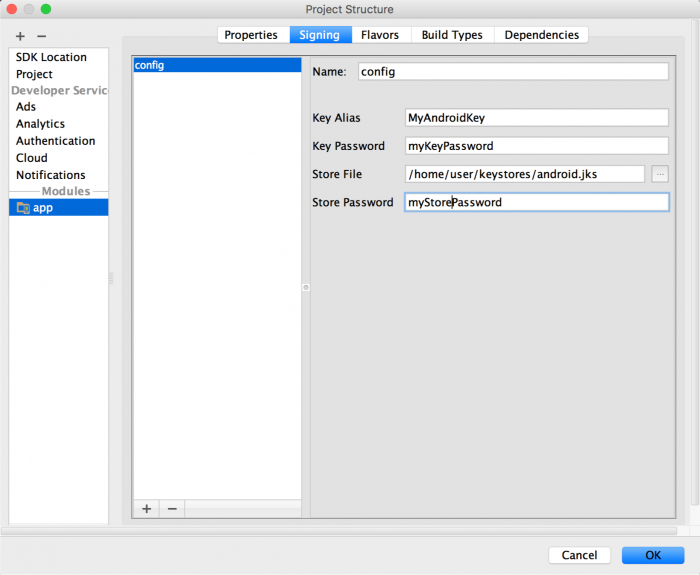
Probably, the only thing you have to do is to create the keychain for this operation. As it suggested in previously linked documentation is easy as:
Then you just fill those fields —and that’s it, your app will be signed from that moment. Now it’s time for Fastlane for the Android side of your project. Honestly, and that’s a good thing, it will be quite similar.
Gradle lane will generate our signed APK so we can forward it directly to App Center. Easy as that!
It’s time to test! Let’s create a dummy PR inside your project and you should see you pipeline spinning! If everything is green and beautiful, don’t hesitate to merge it and immediately jump into CircleCI Dashboard to watch our goodness. Is’s very likely that something may go wrong. Don’t be scared, the easiest thing you can do is to debug the pipeline directly in CircleCI container. You can always click on “Rerun job with SSH” to get directly into that container through SSH — there you can easily investigate what went wrong. Fastlane could be also quite tricky, but I’ve found out that searching through their bug tracker works usually good.
It’ll take some time to properly hack those thing together, but trust me, once you do it your developer experience will be suddenly awesome and you won’t be willing to go back.
If you have still some energy to spend and especially if you are working in a big team. I would suggest you to check out Danger.js that I have mentioned at the begining of this article. You can, for instance, see how Spectrum is using it. It’s a great tool to enforce some practise across the whole team. Everything that could be checked by the machine should be checked by the machine. Have you introduced a new component? Let’s attach an image to PR of it! Have you introduced a new file, does it have @flow annotation? It’s just about your imagination because Danger.js how its name suggests is written in JavaScript. Thus it’s very easy (and convenient) for us to script it — the API is more then friendly.
So, be honest, did you manage to run it? In both cases, we would always appreciate if you share your thoughts with us. I would love to help you if you run into some problem as well, so do not hesitate.


Learn more about CI/CD
Here's everything we published recently on this topic.


