From Enzyme to React Native Testing Library: How I Changed My Way of Unit Testing

How I went from Enzyme to React Native Testing Library and made my unit test more effective and closer to what the users can interact with.
From Enzyme to React Native Testing Library
I’ve been recently refactoring several React components from classes to functions in order to be able to use Hooks as I really needed to reuse logic between components in order to add a huge new feature into one of my React Native apps.
One of the main pain points of doing so was failing tests. In theory, tests should only break when the functionality is broken but the code was actually doing the same, just written in a different way.
So what was the problem then?
The way I wrote my tests. They were mostly checking the implementation details instead of testing input/output or action/result.
In this article, I’ll go through three examples of unit tests written with Enzyme related to:
and how they have been "cleared up" and refactored to use react-native-testing-library instead.
Note: In case you missed it, React Native Testing Library 2.0 is out now. Read the article and find out what’s new.
Accessing state
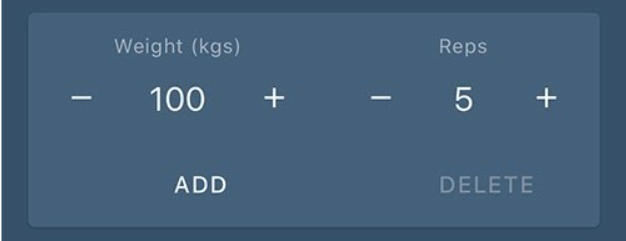
Let’s have a look at the following component where you can increase or decrease a number using the right (“+”) and left (“-”) buttons and where you can also press the input and write any number.
There were several tests here and this is how some of them looked with Enzyme (partially):
The first issue here was checking <rte-code>wrapper.state()<rte-code>:
- It is an implementation detail. Does the final user know about the concept of state?
- As the component is a function now and it uses the useState hook, all the work that Enzyme does under the hood (accessing class instance and so on) won't work anymore.
We want to test here if the user sees what is expected to see, not the “initial state”. Let’s check the actual value (20) that prints on the screen. I was actually doing that in the same test (repetitive) in this way:
Again, there are several issues here:
- Because the component was wrapped in a HOC withTheme(EditSetsInputControls), finding it by displayName became trickier and easy to break.
- at(0) means there are more than one of those inputs, which means if we change the order of them, the test will also break (even that the functionality is working!).
- dive is because of the HOC (to go one level deeper). So if you remove the HOC or wrap it in another one, it will also break.
- Basically, for writing such a test, most of the time was spent thinking “How to access those elements?”
So, here is the rewritten version using react-native-testing-library:
This had a wow effect for me. Why?
- The test is so much easier to read. The library takes care of finding the elements and I had no problem dealing with HOCs or hooks.
- I am only testing what the user sees / can interact with, like text or accessibility labels.
- If I changed this component to a class again, this test would not break.
That was the simplest one. Let’s continue checking more examples.
Accessing elements
In the next example, we want to check the value of an element (a button) in a screen where there are multiple buttons (same element/component).
What was the issue here:
- Using <rte-code>setState<rte-code> directly, which obviously breaks now that is a functional component using hooks + users don’t do that!
- Again, a lot of time is spent by being able to find the element and also very easy to break as it uses <rte-code>at(position)<rte-code>.
How does it look now, rewritten in React Native Testing Library?
The most important thing in the above example (apart from readability) is that we do what the user would do. We do not mess with the component instance internal state but rather we simulate a press event and check if the result of such is what we expected. Again, this test would continue to work if we switch this component back to a class component.
Let’s continue with a less trivial example.
Simulating events
In the following scenario, we want to test if when we type something in the search input, the displayed data in the list is correctly filtered.
First, we’ll test it with Enzyme (apologies for the code but it’s going to be messy):
Can you see how tedious it looks? At first glance, I found it beautiful. But not anymore.
What was the issue here:
- I spent most of the time on creating an environment where we can test something.
- We would deal with an implementation detail (component state) and also triggering a component method directly <rte-code>.instance._getData()<rte-code>.
- This test has another funny thing. Imagine you disable the search input, the test would still pass!
Here is the refactored test with the help of react-native-testing-library:
Ridiculously different, right? It’s caused by the fact that accessing internals (like before) is hard. Here we just:
- simulate a press on a tag (core). Previously it was setting <rte-code>state.tagSelection<rte-code>,
- simulate that the user is writing a text in the search input (Air bike). Previously it was setting <rte-code>state.searchQuery<rte-code>,
- check the final output.
Again, this test would not break if we switch the component to a class. Or even better, if we lifted the whole local state to something like Redux, the test would not break as the result/functionality would be the same for the user.
Conclusions
All the aforementioned examples taught me a lot and based on this experience, I prepared a shortlist of the most relevant conclusions that came to my mind:
- Try to write your tests in a way that they will not break if the implementation is totally different (but the functionality/result will be the same).
- Try to simulate only what the users can do.
- Tests shouldn’t be harder to write than the actual code.
- Hooks can also be tested separately now (functionality) and I also find it useful to extract and test them to its own file (like for longer algorithms or complicated if-else code).
- react-native-testing-library helps not only because of its API, but it does not let you access internals and enforces you to test in one particular way.
- You can get used to making your apps more accessible using accessibilityLabel. Then you can use the getByA11yLabel method too. With that, you made your components also capable to be e2e tested by using, for example, Detox. Please keep in mind that the “accessibility label” is no replacement to “test ID”, use it only if it makes sense for your users. See more on Accessibility from the React Native docs.
If I had to wrap the whole article up in one sentence, I’d say that:
Whatever you think was correct in the past, it can always turn out to be wrong after all. This is how I learn.
Happy testing!
And if your team could use help from senior developers, check out our React Native development services – and give us a shout!

Learn more about Testing
Here's everything we published recently on this topic.