Testing accessibility is crucial, and while you can definitely write UI tests it's very easy to forget about testing smaller parts of the app. If you have no tests starting from scratch, writing a decent amount can be time-consuming. Manual testing is prone to inconsistencies and can take even more time.
AccessibilitySnapshot is a tool that visually represents your components’ accessibility properties, which is great for spotting areas to improve. It also helps to catch regressions as you develop your app. With the right setup, you can test the majority of your app very quickly.
In this article, I will describe the steps taken to get AccessibilitySnapshot to work in my React Native project. Also, I will take some extra steps to simplify creating new tests in just one line of code.
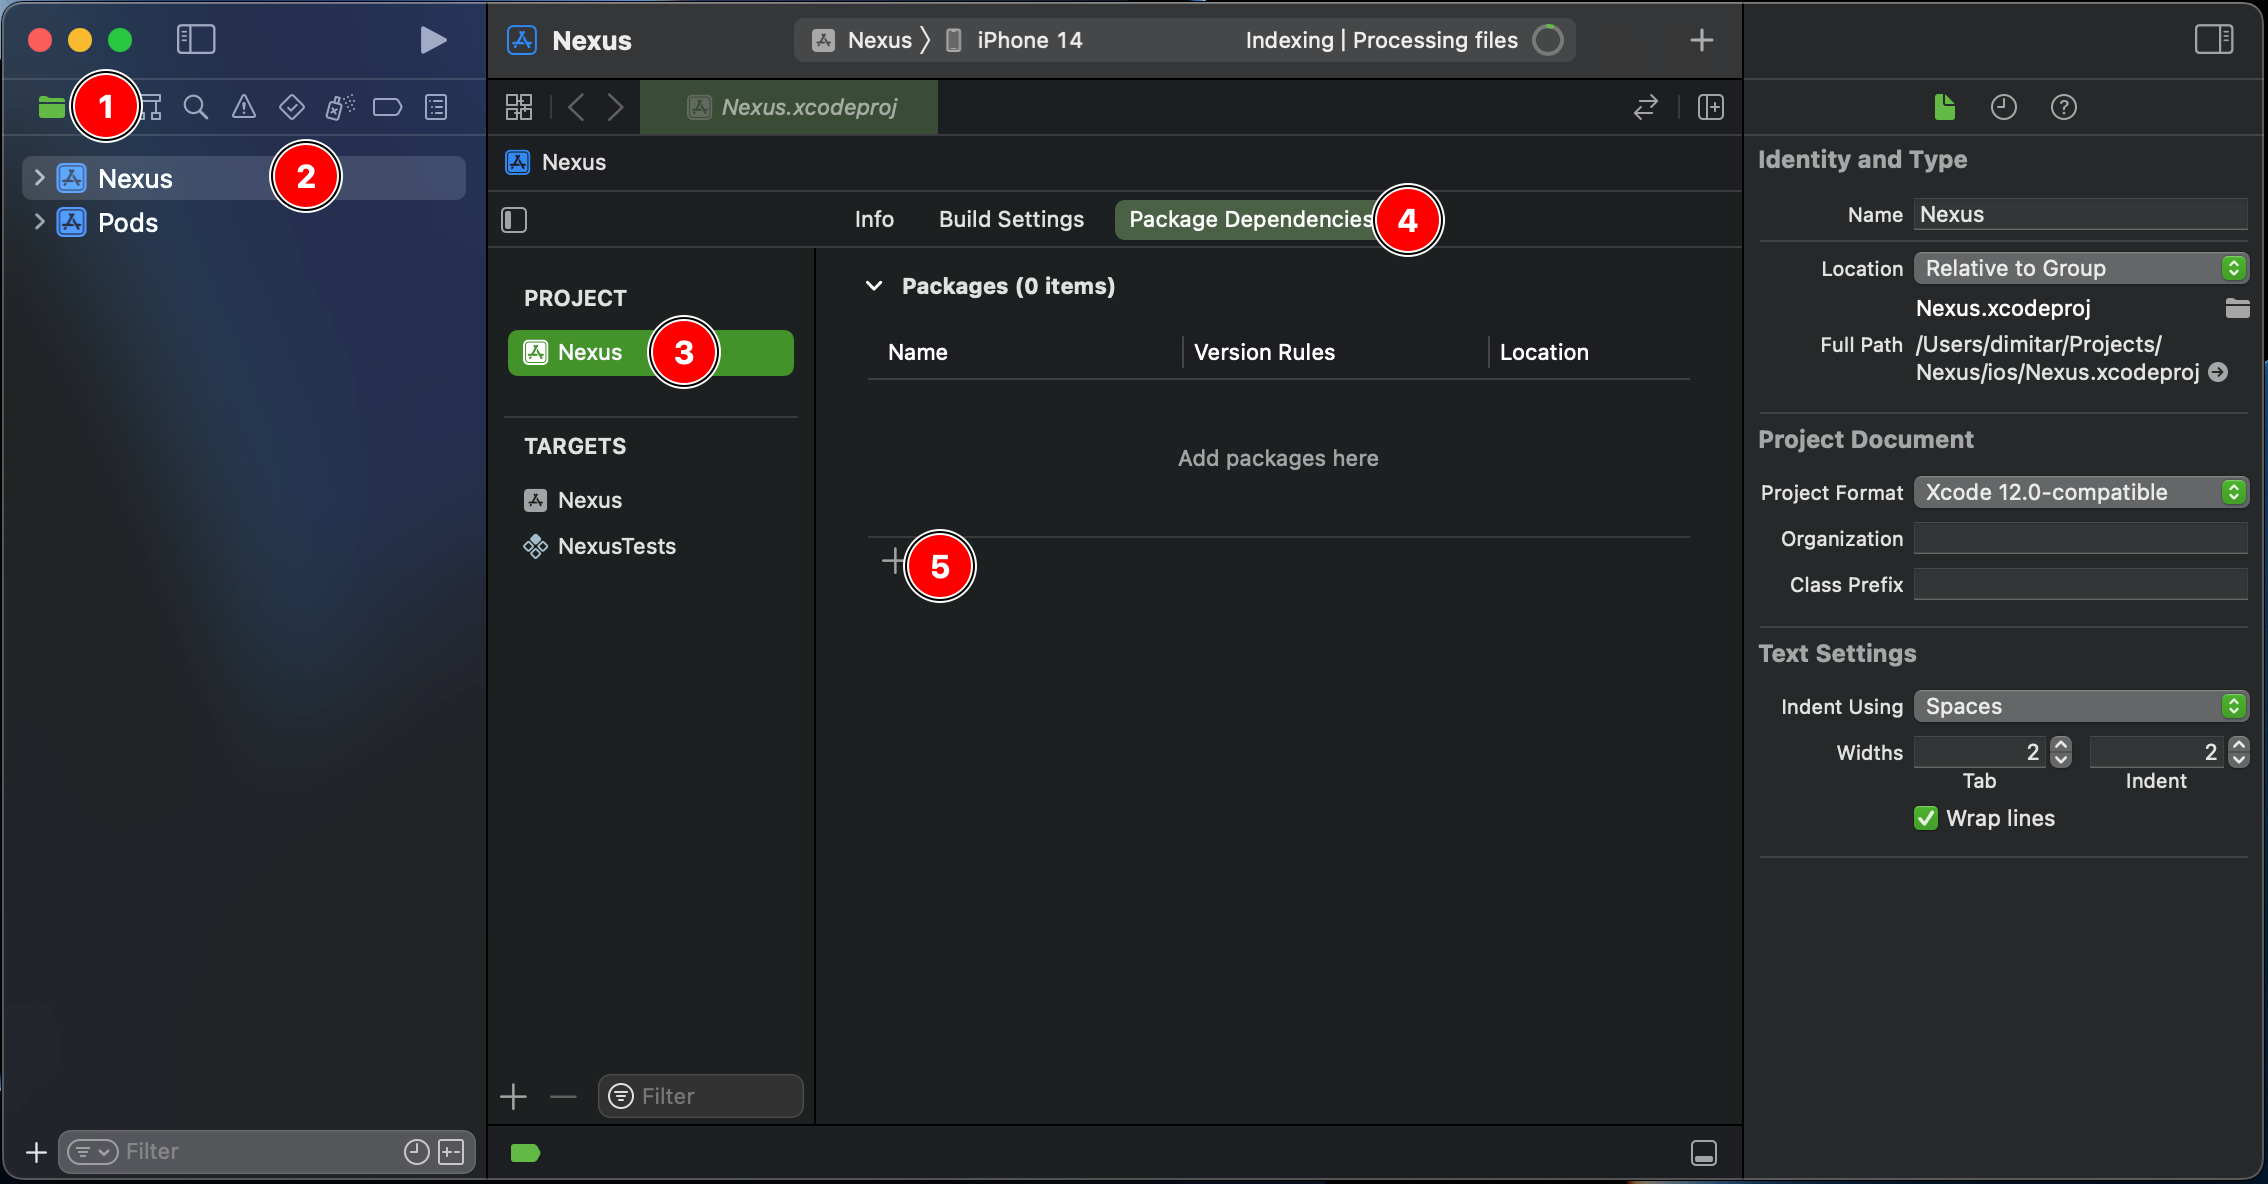
Step 1: Add the dependency
Open your app's xcworkspace. In the Project Navigator select your app's project. In the xcodeproj tab, select your App project and click on Package Dependencies.
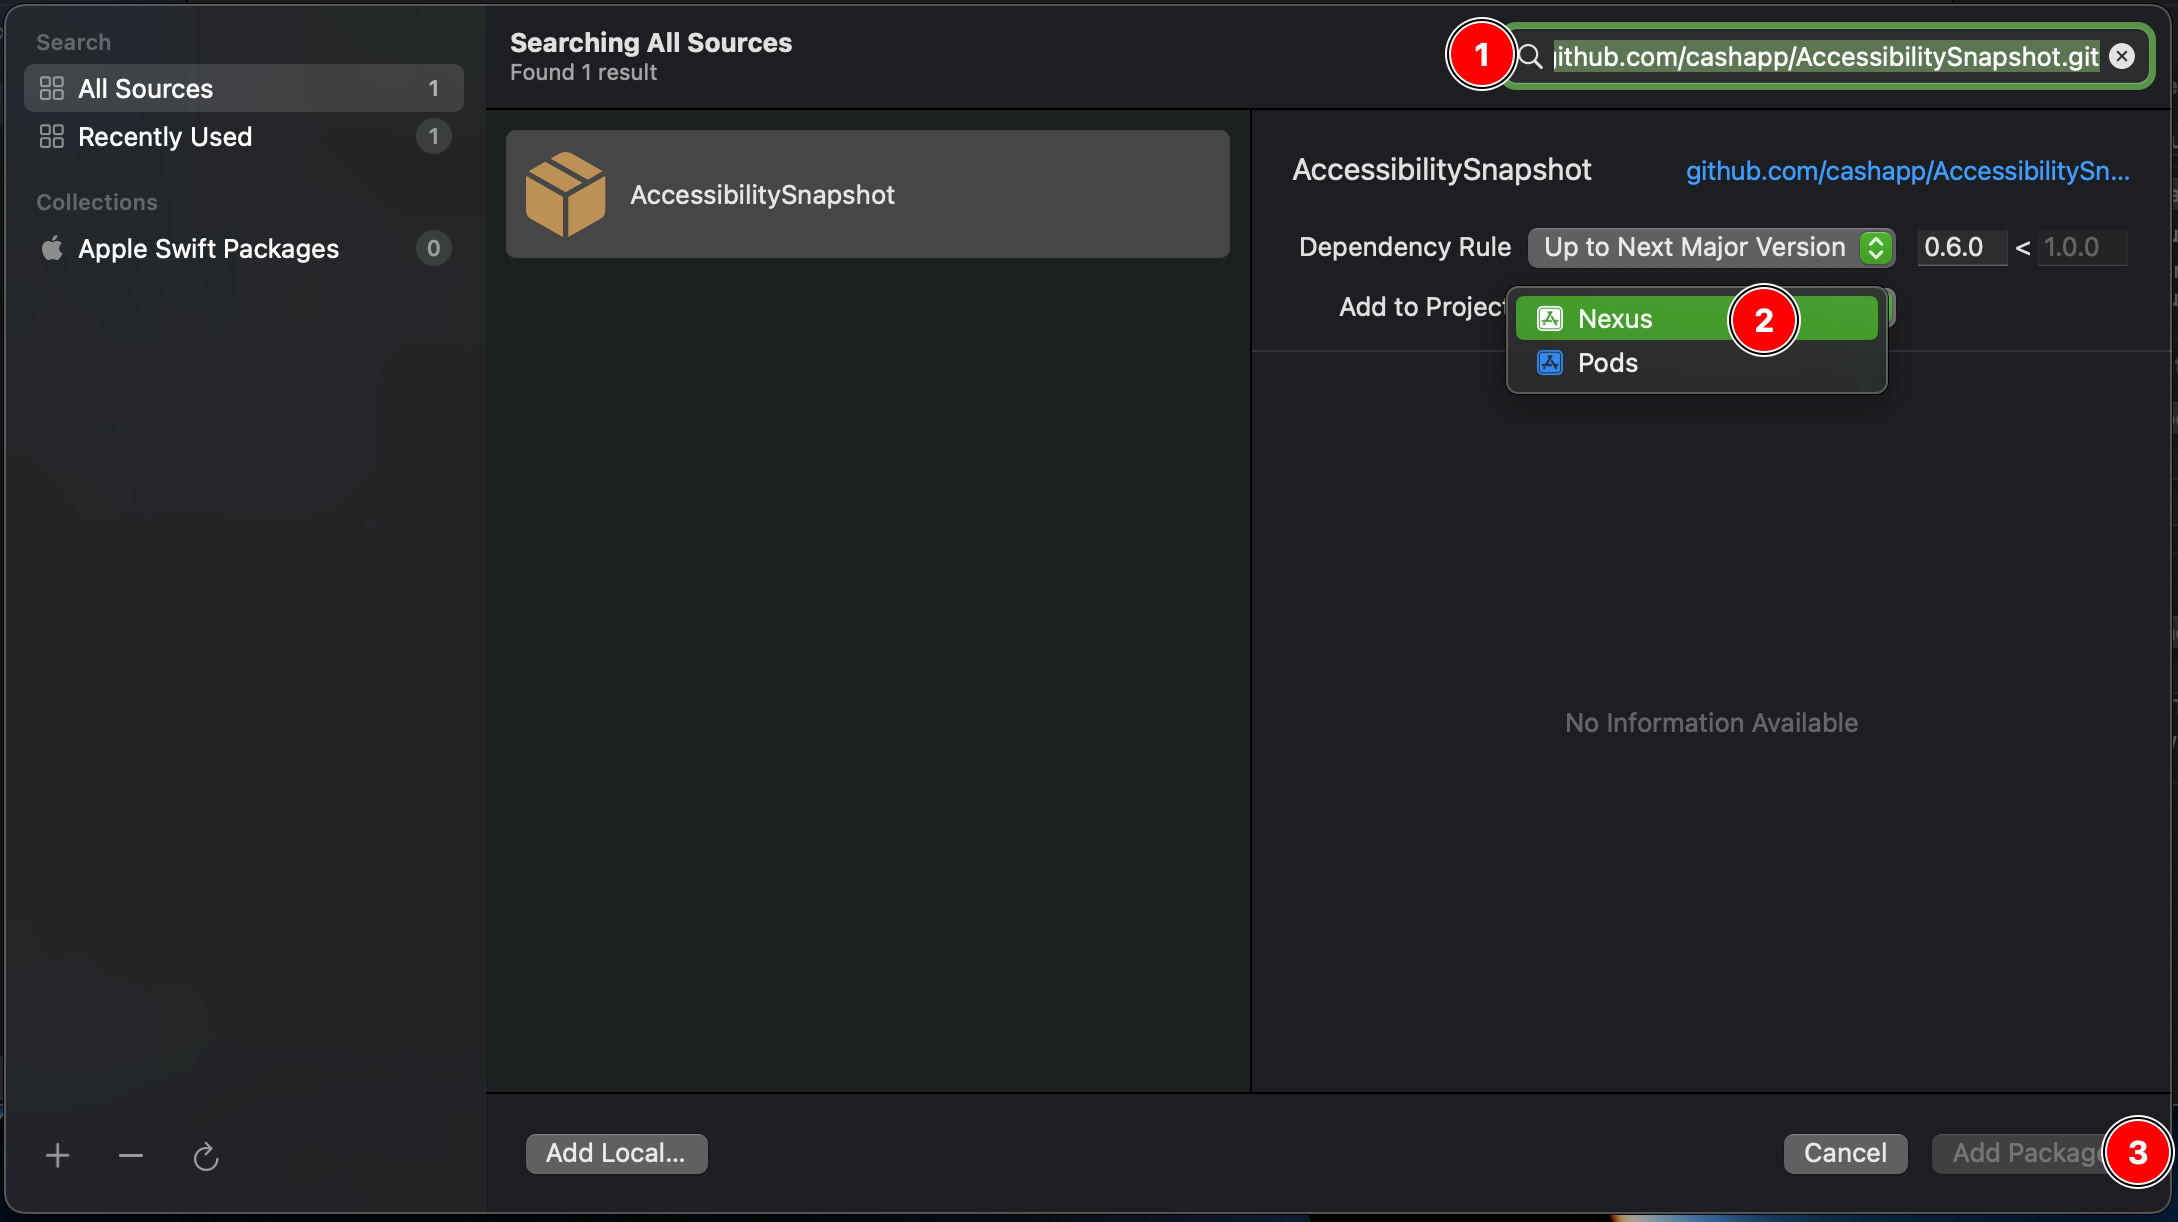
After clicking the Add button paste the AccessibilitySnapshot repo URL in the search bar. On the “Add to Project” menu select your app’s project and click “Add Package”.
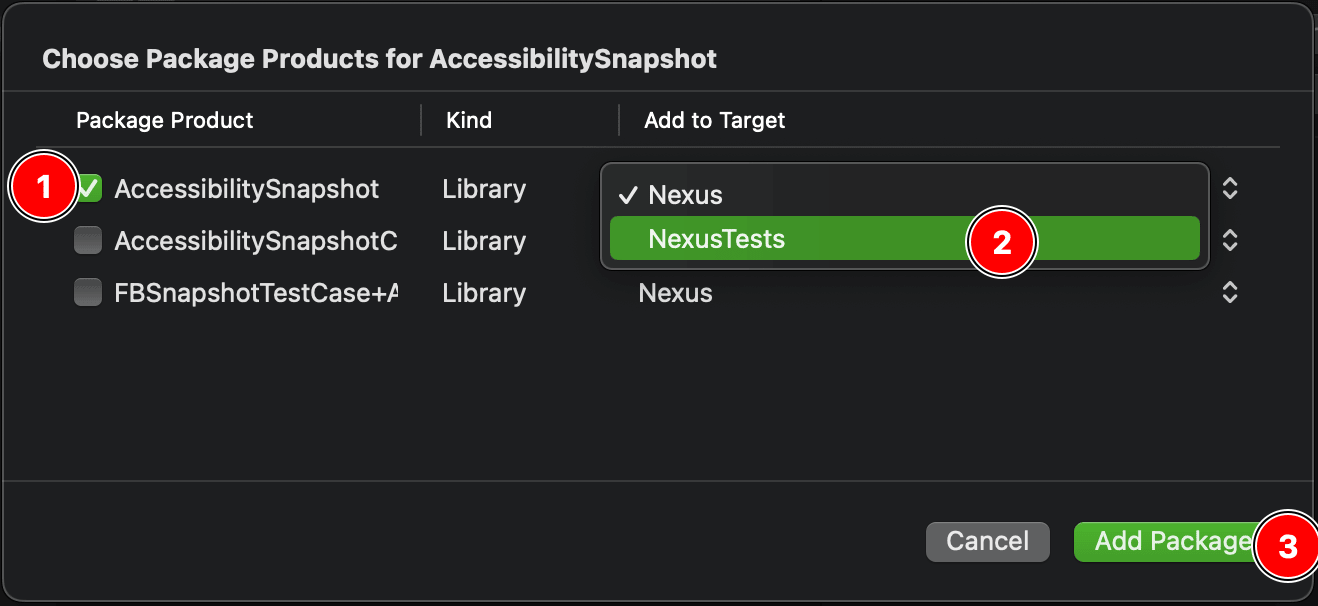
After a bit, a dialog with products will appear. We only need AccessibilitySnapshot (the first one), however, in the "Add to Target" column we have to change it to the tests target.
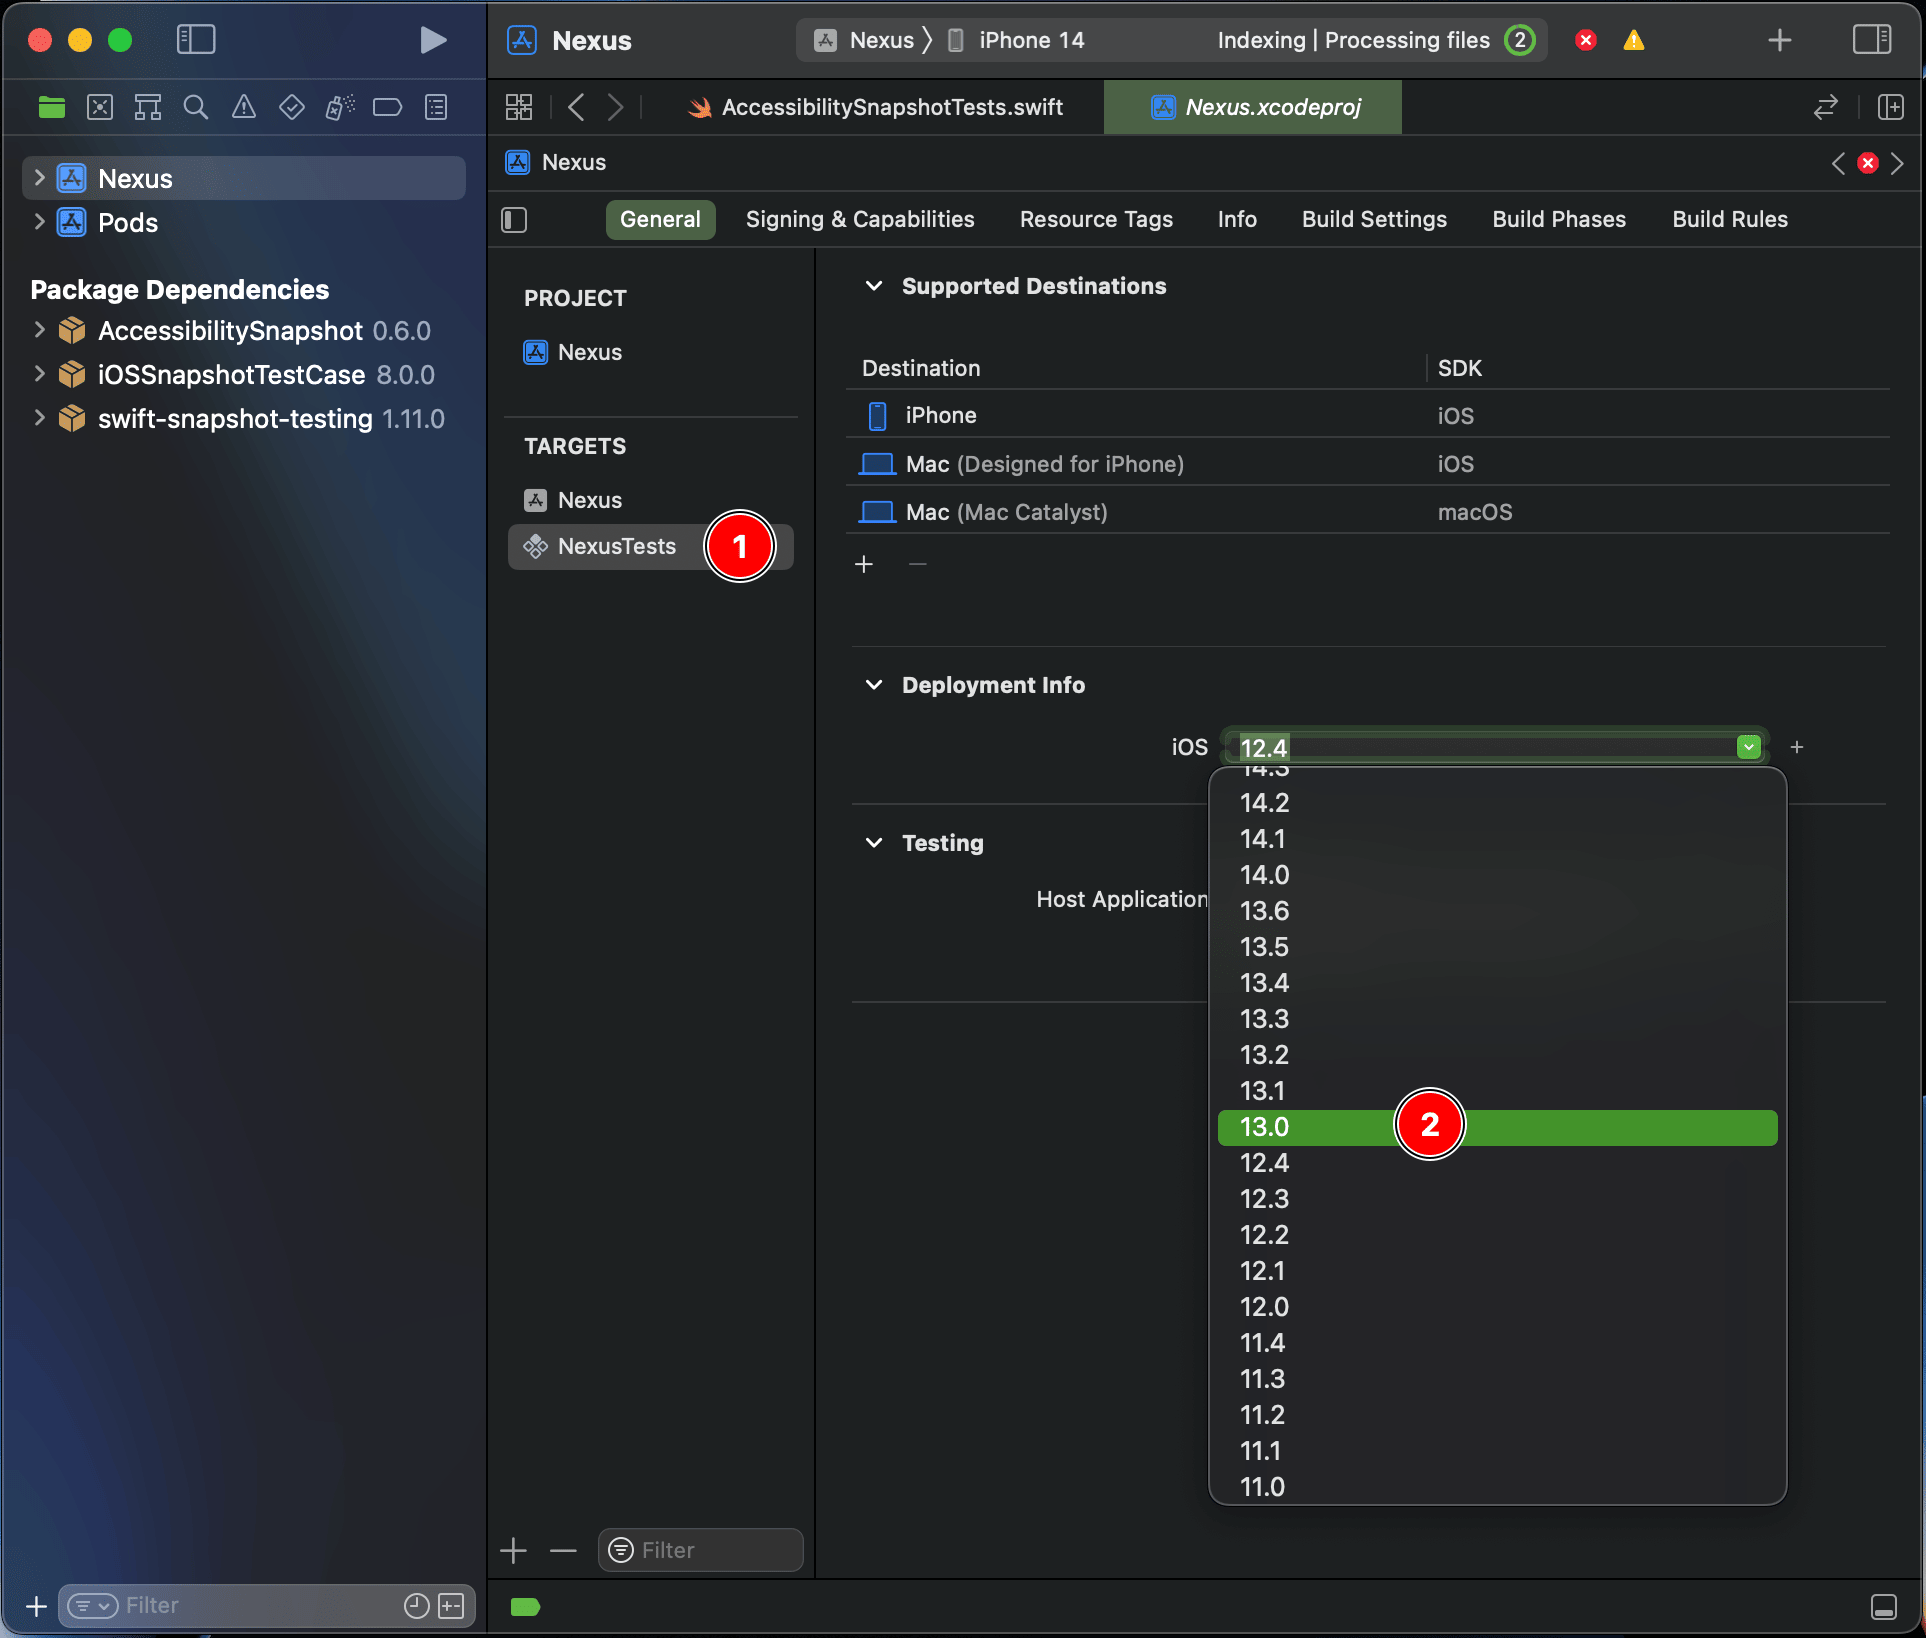
AccessibilitySnapshot requires iOS 13 so we will need to go to our test target and change the deployment target.
Step 2: Creating a test file
The default React Native template has a single tests Objective-C file with a single test method - (void)testRendersWelcomeScreen. You can delete that file.
Right click on the tests folder and select "New File…". Create a new Swift file and call it AccessibilitySnapshotTests.
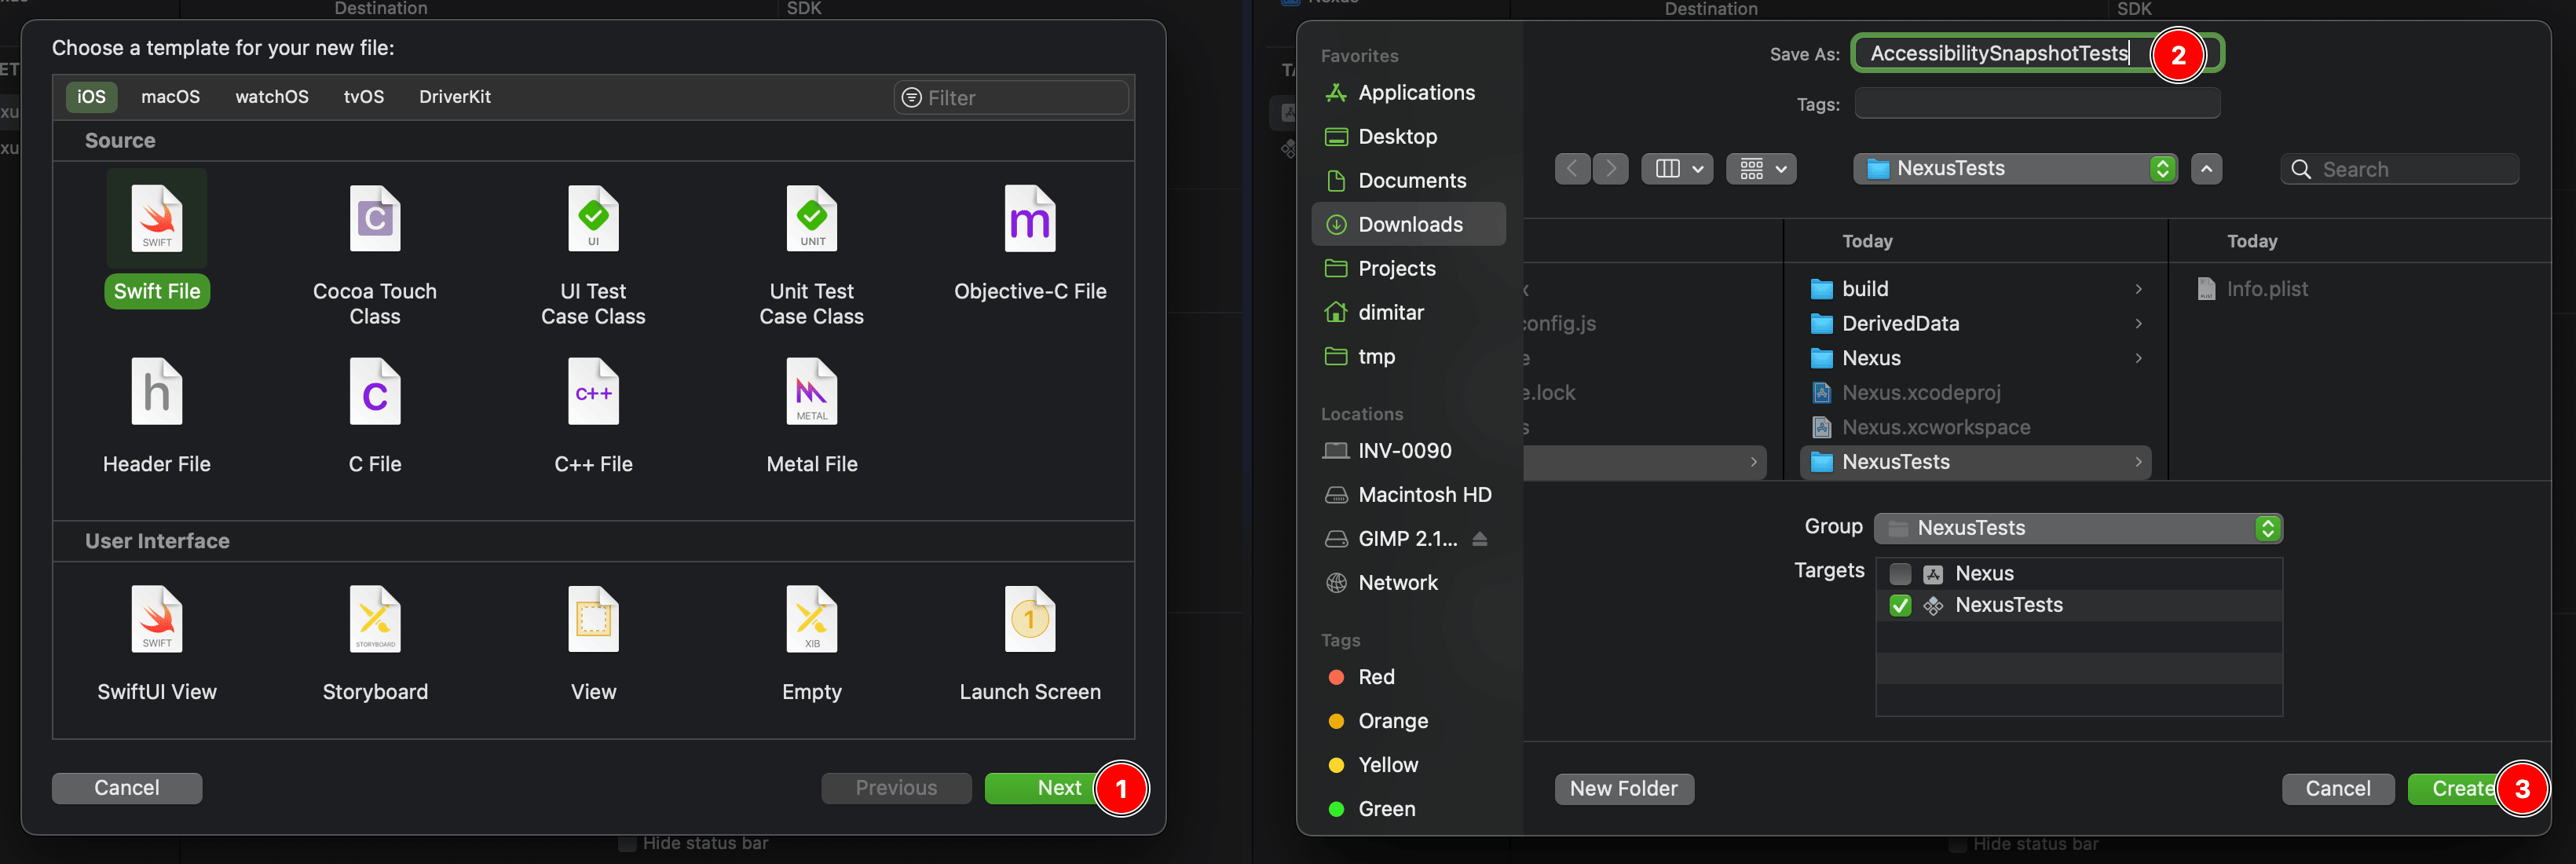
Xcode will ask you to configure a bridging header, we don’t need it so click "Don't Create".
In the newly created file paste the following code:
In my case I want to create an accessibility snapshot of the profile screen of my app so I opened my Profile.js and added the following:
The first argument of AppRegistry.registryComponent and the moduleName on line 14 in AccessibilitySnapshotTests.swift must match.
Step 3: Running the test
Let's look at this library in action. Make sure the packager is running and in Xcode's menu bar select "Product" and then "Test" or use the keyboard shortcut ⌘U. After a little while the test should fail.
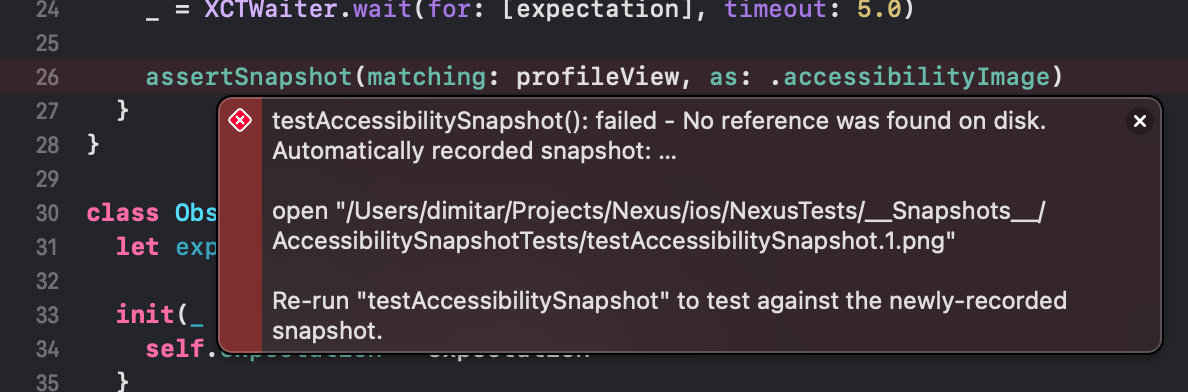
And if we look at the error message we can see that a snapshot was recorded. Now all we need to do is rerun the tests, and they should pass!
Ok, but what if we want to refactor our component, and the snapshot becomes invalid? Just temporarily add isRecording = true before the assertSnapshot line and run the tests again.
Step 4: Continuous Integration
Before we automate the snapshot testing we need to do a couple of small changes. The images produced on Apple Silicon and Intel processors differ so our tests would fail if our CI's architecture doesn't match. The difference is so little that you can't even see it. For that we need to change the version of AccessibilitySnapshot that we use.
Navigate to "Package Dependencies" again and double click on AccessbilitySnapshot.

In the dialog window, switch to the "Brach" rule, paste entin/perceptual-precision in the text field, and click "Done".
Next, we need to add a new argument perceptualPrecision to .accessibleImage:
Currently our tests will load the JavaScript bundle from the packager but on CI it won't be running so let's make a quick modification to the AccessibilitySnapshotTests.swift file:
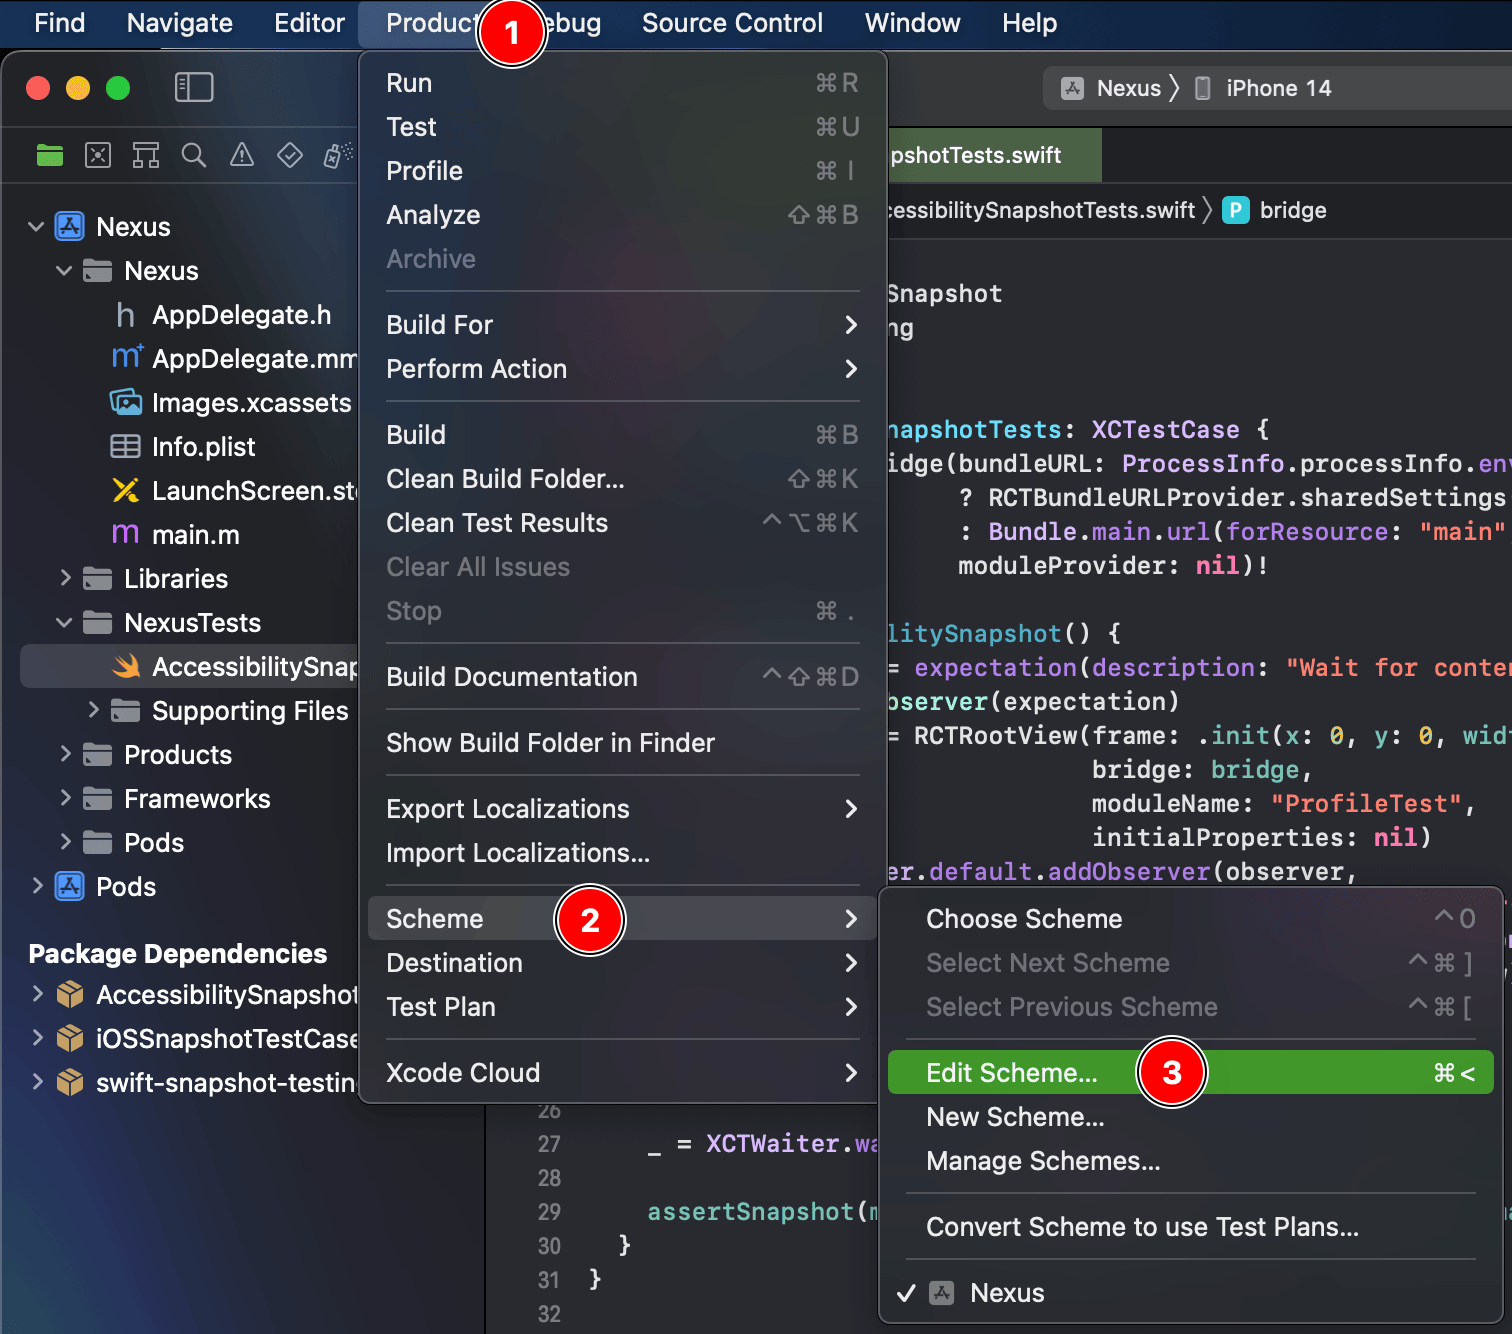
And then we need to add the USE_LOCAL_BUNDLE environment variable in the Xcode test scheme. In the menu bar select "Product", then go to "Scheme", and click "Edit Scheme…".
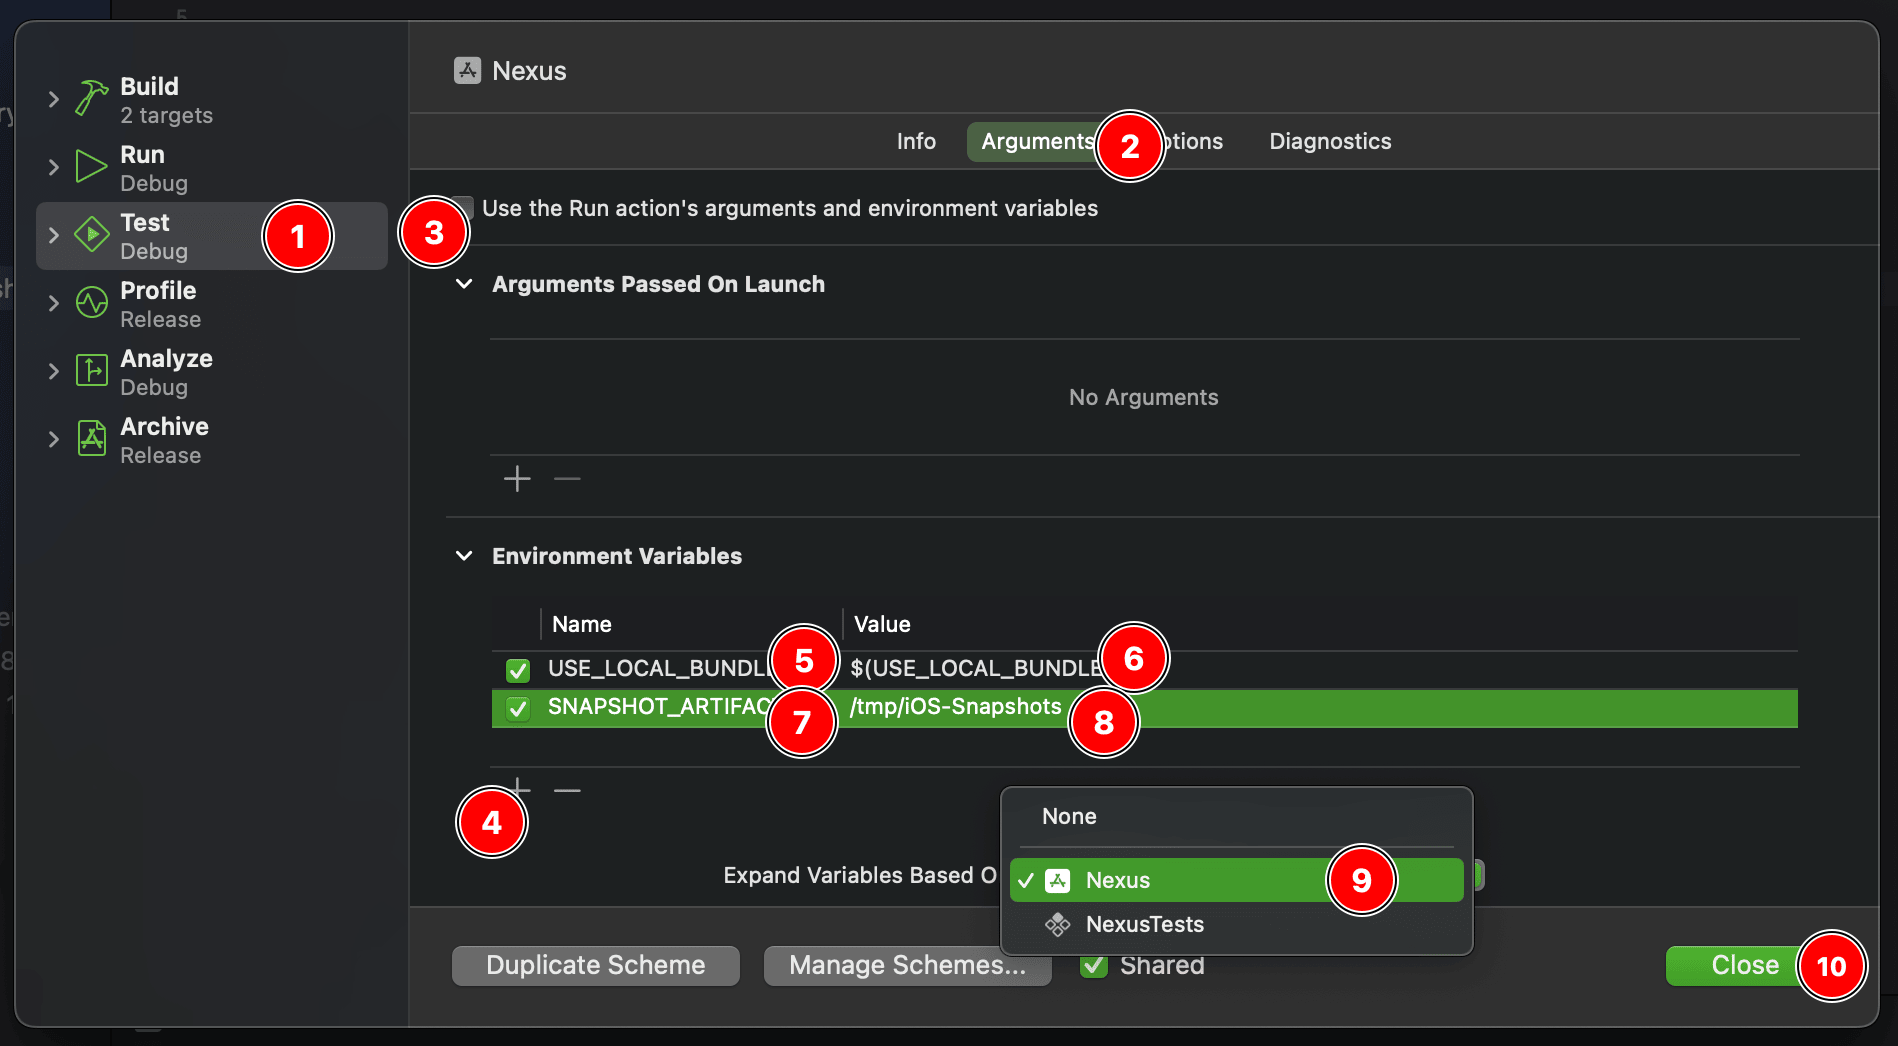
Now select "Test" from the sidebar. Switch to the "Arguments" tab. Deselect "Use the Run action's arguments and environment variables". Click on the plus button under the environment variables section. Set the name to USE_LOCAL_BUNDLE and value to $(USE_LOCAL_BUNDLE). Also, let's add one more variable called SNAPSHOT_ARTIFACTS with a value of /tmp/iOS-Snapshots. In the "Expand Variables Based On" dropdown select your project (not the tests target). Click "Close". In Git you will see changes to an xcscheme file; make sure to commit them.
Time for the workflow file. I will be using GitHub Actions:
A quick summary of the workflow: it adds FORCE_BUNDLING=1 to ios/.xcode.env.local and runs xcodebuild USE_LOCAL_BUNDLE=1 test on a specific simulator configuration.
I also wanted to be able to see the snapshots that were generated in case the CI job fails so I added a step to upload the contents of /tmp/iOS-Snapshots as an artifact.
All that is left is to open a pull request and wait for the CI job to pass.
Sanity checking
I want to make sure that my workflow fails when it should. After merging the PR with a passing CI I made a fake refactor of my profile component where I delete the accessibility props. As expected, the workflow failed. The results are in:
We can easily see that I completely forgot to test if my component is accessible after the refactor. Changes were requested!
Step 5: Improving the developer experience
Testing multiple components
You can copy the testAccessibilitySnapshot method for each component that you want to test but for me modifying native files this often is cumbersome. Instead I would prefer if I can register every component in JavaScript code and have the native code run a snapshot test on every registered component without the need of touching Swift files. We can create a native module to aid us with this task. Create one more Swift file in our tests target. Call it SnapshotTests and paste the following:
To expose the class to React Native we will need to add an Objective-C file SnapshotTestsBridge.m:
To make it very simple to add snapshot tests, let's create a registerAccessibilitySnapshotNode function in JavaScript. It will call AppRegistry.registerComponent and SnapshotTests.registerName:
And now let’s refactor our code in Profile.js to use our new function:
Now we need to modify the AccessibilitySnapshotTests.swift file. It will become quite a bit more complex, but we wouldn’t need to modify it every time we want to make an accessibility snapshot of a new component:
A quick explanation of the new version:
- It begins by creating a bridge instance
- The bridge immediately starts loading JavaScript
- Our code waits for the JavaScript bundle to be loaded and executed by listening to RCTJavaScriptDidLoadNotification, every component that we want to test should be registered by then since we specified registerName: as synchronous
- Loop through the registrations array and assert the snapshot for each one
In my demo app, I proceeded with splitting the profile screen in separate components so that I can create a separate snapshot for each. All I had to do was add a call to registerAccessibilitySnapshotNode for each component.
And there it is! Now we can just add a registerAccessibilitySnapshotNode call for every component without any Swift file modifications.
Custom width and height per test
The hardcoded size of 300 by 700 isn't ideal so it would be awesome if we could configure this per snapshot. Let's do it!
We need to edit our native module to store not just the name of the component but also the desired width and height.
We're updating the method signature so this will need to be reflected in SnapshotTestsBridge.m too:
Let's update AccessibilitySnapshotTests.swift to use the provided width and height:
Lastly, our JavaScript helper function will need an update:
And now we can set the width and height:
Tips
Before generating/testing snapshots make sure that global settings such as dark mode and text size have been set to default (or simply use a new Simulator). As of right now, there is no way to specify those settings per snapshot.
Ideally, you want always to run those tests on the same Simulator configuration. If your components depend on the screen size, then you can expect that tests may fail when run on a different configuration.
Important notes on the article
The code in this article is compatible with React Native 0.71, it might not work if you're on a different version.
As I was writing this article, I made a demo repository.
Summary
We looked into the process of adding and using AccessibilitySnapshot in our React Native project. We covered how to set up GitHub Actions to run the tests automatically. We also improved the process of writing new tests to be as simple as possible. Now, we are ready to start testing!
The quickest way to get accessibility tests for the majority of your app will be to write 1 test per screen. Follow that with covering dialogs, popups, and menus that require an extra tap to show up. And then try to cover the UI that is displayed only when your components are in some non-default state (e.g. when a text input is displayed only after a checkbox is checked). Good luck!


Learn more about Accessibility
Here's everything we published recently on this topic.